During the release management process, Salesforce administrators often need to compare the Metadata differences between Sandbox and Production. The comparison can show which Sandbox assets need to be deployed to Production after user acceptance testing. The Metazoa Snapshot Org Management product provides powerful tools to compare Salesforce Orgs and migrate changes between them.
The Metadata Differences report documents all of the differences between any two Salesforce Orgs. This allows administrators to see changes made by developers and other important customizations made with the Setup Menu. This information is available in HTML, CSV, and PDF format. The reports can be shared with team members, saved as local files, or stored as Salesforce Content. Snapshot also provides powerful release management tools to deploy these changes between Orgs during the release cycle.
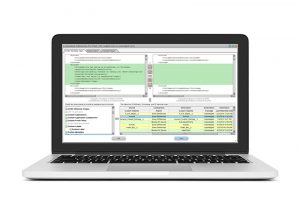
The Metadata Differences report looks at the differences between two Orgs connected by a deployment arrow. The report specifies the number of differences for each metadata type, and the top slide down panel allows an administrator to drill down into the line by line details. This report can be used to explore the exact differences between two Salesforce Orgs, or between a developer project and a Salesforce Org. For example, if an administrator is getting ready to migrate a Sandbox into Production, then they could use this report to explore and document the differences before migration.
Snapshot provides two dozen automated reports that are hugely beneficial for release management as well as corporate compliance, governance and security. These reports are available in CSV, HTML, and PDF format. All of these reports can be scheduled and automated. Many of the reports have conditional triggers and are sent out only when problems are detected. The brief movie below covers the Metadata Differences report.
Here are some helpful links with more information about metadata differences:
Snapshot provides powerful tools for Salesforce Administrators that help manage the change and release process, visualize org complexity, improve security and compliance, and lower the total cost of Org ownership. Visit the AppExchange to start a 14 day free trial or click the button below to schedule a demo.
 Congratulations!