Snapshot has Sprints and User Stories for managing collaborative projects with Kanban Boards and Gantt Charts.
Snapshot can create Sprints and User Stories that help Salesforce administrators manage complex Orgs with collaborative projects and teamwork automation. Project managers can create Sprints and assign User Stories to individual developers and administrators. These individual contributors can add metadata assets and deployment tasks to their User Stories. Lastly, a release manager can merge multiple User Stories and deploy the metadata into any destination Salesforce Org, developer project, or online repository.
The User Story capability requires the latest Managed Package for Snapshot, version 3.5 or above. The new Managed Package contains custom objects that are installed in the license Org. The Sprint custom object has a related list of User Stories. Each User Story has a related list of deployment tasks and metadata assets. There is also a Sprint History object to record the results of each deployment. Lastly, there is a Task Template object to store information about common deployment tasks.

We also provide some example Permission Sets in the Managed Package. These can be used to assign roles to your team members. The three roles are Super Admin, Sprint Manager, and Standard User. The Super Admin has full access to all of the Snapshot custom objects. The Sprint Manager can create Sprints but cannot edit workspace permissions. The Standard User can see Sprints but not create them. Any permissions that are assigned to the admins and developers in your Org will be reflected in the User Story editing interface.
The Manage Sprints interface is where project managers can create, edit, and delete Sprints and assign User Stories to individual contributors. Sprints can be managed with a simple to do list, a Kanban Chart, or a Gantt Chart. A simple Sprint might be managed with a to do list. A more complex Sprint might be managed with a Kanban Board. A long running Sprint might need to be managed like a project with Gantt Charts. You can use all of these visualizations at the same time or focus on one in particular. Here is the first tab of the Manage Sprints interface.
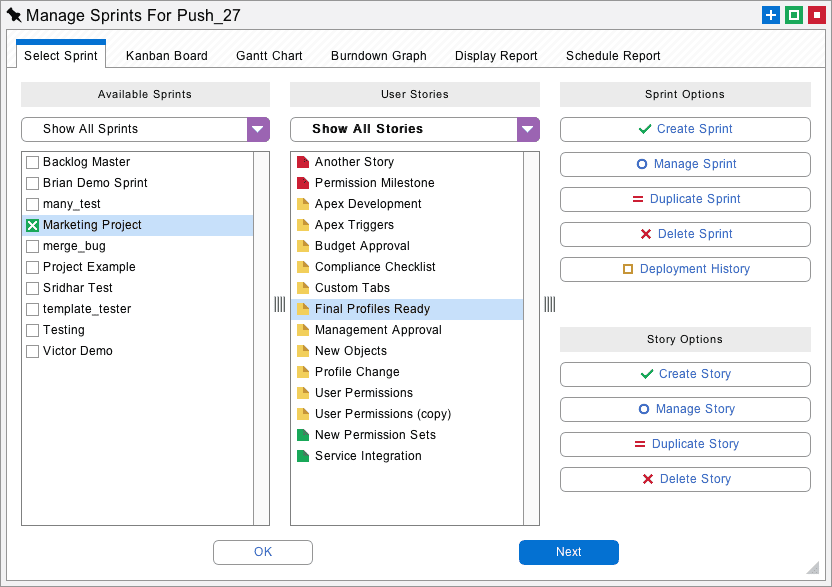
When you select any Sprint, you will see the related list of User Stories in the middle where they can be selected. From the middle list, you can create, edit, and delete User Stories. Sprints and User Stories can also be edited from the Salesforce HTML interface, or through the SOAP API for integration with external systems. Click the Create Sprint or Manage Sprint button to see the Sprint editing dialog.
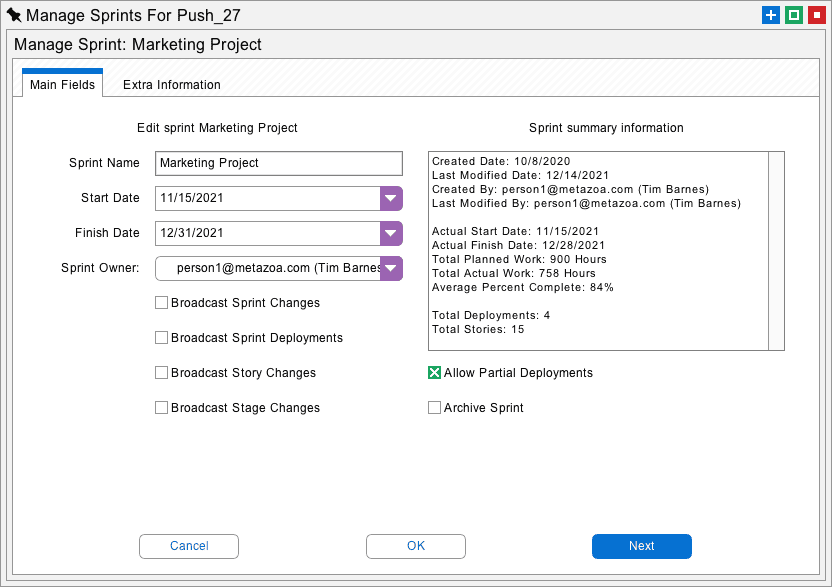
From this dialog you can edit the Sprint name, start date, finish date, and Sprint Owner. The checkboxes can be used to automatically broadcast email messages to other team members. Here is what they do:
The Extra Information tab in the dialog allows the editing of Sprint comments, Burndown information, work days, and vacation days. The work and vacation days are used for calculating dates on the Gantt Chart. This is discussed later on.
If you select a User Story from the middle list of the Manage Sprints interface, there is an option to Create or Manage the User Story. Click either button and the User Story editing dialog will appear.

On the left, you can give the Story a title, a Kanban Stage, a theme, and select the Story Owner. Below that is the descriptive body of the User Story that should explain who, what, and why. For example, a Sprint on Inventory Management might include the User Story:
“As a Salesforce User, I can see the current inventory level in the warehouse, so I know which products are available.”
On the right is information that is mainly relevant for longer Sprints that are viewed with a Gantt Chart. A User Story can be connected to a Parent Story with the parent links menu. The Parent Story must be completed before the User Story can begin. The constraint date can change the time that development work for the User Story will start. The task duration specifies the number of days that the Story will take to complete. Lastly, planned work, actual work, and the percent complete will control the amount of planned and actual effort required to complete the Story. The planned work, actual work, and percent complete are used to generate the information shown on the Burndown Graph. This is discussed in more detail later on.
The next tab of this dialog shows detailed comments, story documentation, technical specifications, and functional specifications for the User Story. This information should be filled out by the individual contributor and remains a permanent part of the Story documentation.
The next tab shows the Kanban Board for the Sprint. The Kanban Stages are shown across the top and the team members are displayed down the left-hand side. Kanban Boards help manage work by showing which team members are available and the current stage of all the Stories. You should avoid assigning one team member too many Stories, and likewise you should limit the number of Stories in any given Kanban Stage. A typical Sprint might take between two and four weeks to complete.
User Stories can be reassigned to different Stages or team members by dragging and dropping the cards on the board, below. You can double click the cards and right click the table to create and delete User Stories. This same view can be set up in the Salesforce Lightning interface and this is included in the Snapshot Managed Package as flexipages.
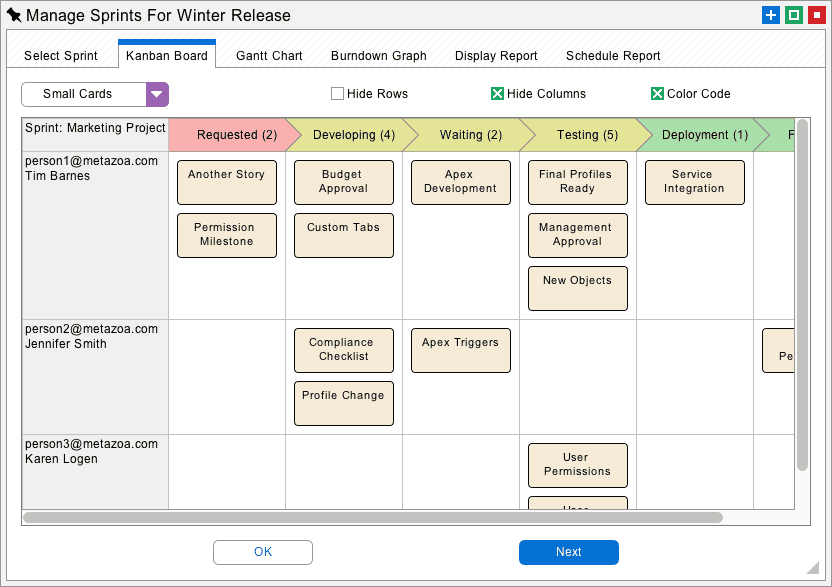
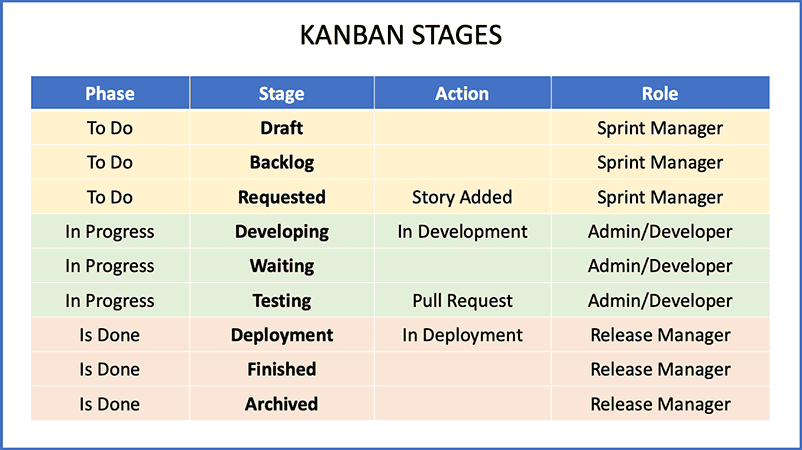
The Kanban Stages used by Snapshot are divided into three main phases. The “to do” phase is for Stories that are being drafted or in the backlog. When a Story is added to a Sprint the Kanban Stage changes to requested. The “in progress” phase is for stories that are being edited by individual contributors. When they are finished with their work a pull request will change the Kanban Stage to deployment. The last “is done” phase is for User Stories that are at the end of their lifecycle and on the way to being archived.
The three Kanban Stages correspond to the three interfaces that Snapshot offers for Sprints and User Stories, and the three roles that team members will likely fill. The “to do” phase will employ project managers who create Sprints and assign out User Stories with the Manage Sprints interface. The “in progress” phase will employ individual contributors using the Update User Story interface. Lastly, the “is done” phase will employ release managers who deploy the Sprints with the Deploy User Stories interface.
The next tab has the Gantt Chart interface. Each User Story is displayed as a task bar on the chart. Gantt Charts are useful for long running projects where some Stories must be completed before other Stories can begin. The Gantt Chart will calculate the amount of time for the entire project if some stories are delayed or contingencies change. Just like the Kanban Board, you can double click the task bars and right click the table to edit the chart.

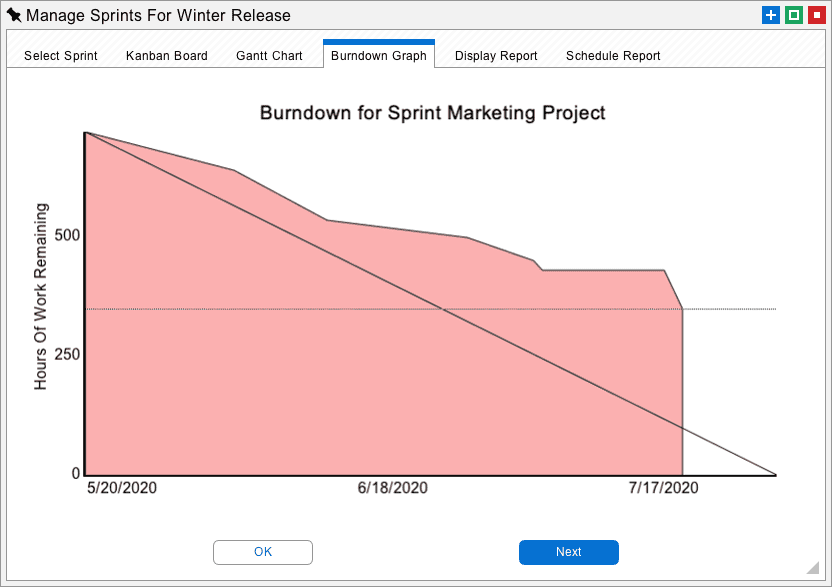
The next tab shows the Burndown Graph for the Sprint. If the area graph appears to the upper right of the diagonal line, the Sprint is behind schedule. If the area graph appears to the lower left, the Sprint is ahead of schedule. Whenever the percent complete or actual work changes on a User Story, the Burndown Graph will be updated. This data is stored as a simple list of dates and actual hours worked in the Sprint object. If for some reason this information gets out of whack it can be edited on the second tab of the Sprint editing dialog.
The last tab generates a report for Sprints that were checked on the first screen of the interface. This provides a simple way to detail the current status of any Sprint and send this information to team members.
The Update Story interface is for individual contributors that have been assigned User Stories by a project manager. These people might be developers working on an application or administrators making changes to an Org with the Setup menu. Their job is to complete the User Story and make a pull request that moves the Story into deployment.
There are two types of content that an individual contributor can add to a User Story. First, they can select metadata assets that need to be created or deleted as part of the Story. The created assets can be found in the source snapshot that is connected to the deployment arrow. The deleted assets can be found in the destination snapshot. This is similar to a regular deployment, except the created and deleted assets are not deployed but rather stored in the User Story.
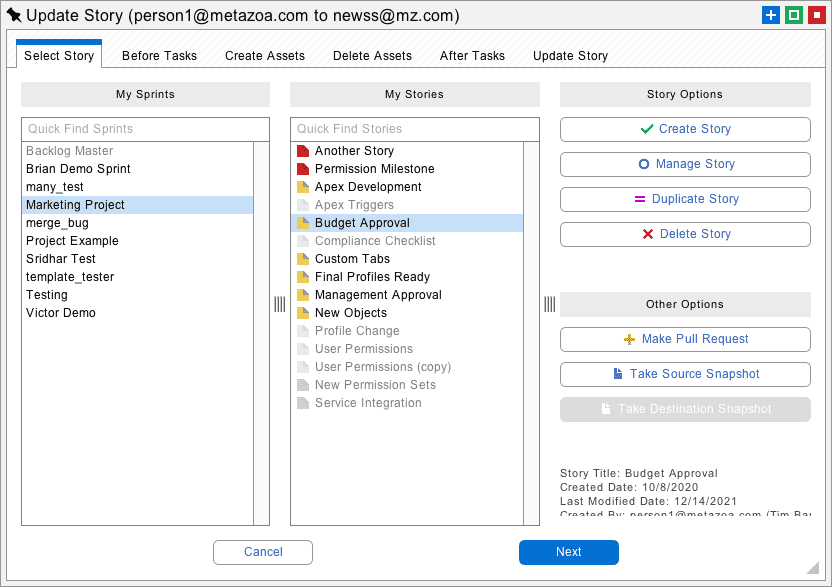
The second type of content that an individual contributor can add to a User Story is before and after deployment tasks. The deployment tasks cover situations that the Metadata API does not handle, or other situations where some manual activity should be completed before or after deployment. For example, employees might need to be notified of limited access to a Salesforce Org before deployment, or various tests might need to be run after deployment. Some deployment tasks involve manual changes with the setup menu. Here is the first tab of the Update Story interface.
The Story Owner can select one of the Sprints that they are involved in from the list at left, and one of the User Stories that they own from the middle column. The next four tabs add content to the selected User Story, including before tasks, create assets, delete assets, and after tasks. The selected deployment tasks and metadata assets are saved as compressed objects in the license Org where the Snapshot Managed Package is installed. The deployment tasks and metadata assets are saved as child objects of the selected User Story.
As mentioned earlier, the metadata assets that can be created are found in the source snapshot item, and the metadata assets that can be deleted are found in the destination item. If the source or destination snapshot is not up to date, then the Take Source Snapshot and Take Destination Snapshot buttons at right will be active. Either snapshot can be updated there.
There is also a Make Pull Request button at right. This will move the selected Story into deployment and remove the Story from the middle list. The Sprint Owner is notified via email about the pull request. The next tab that adds before tasks look like this:
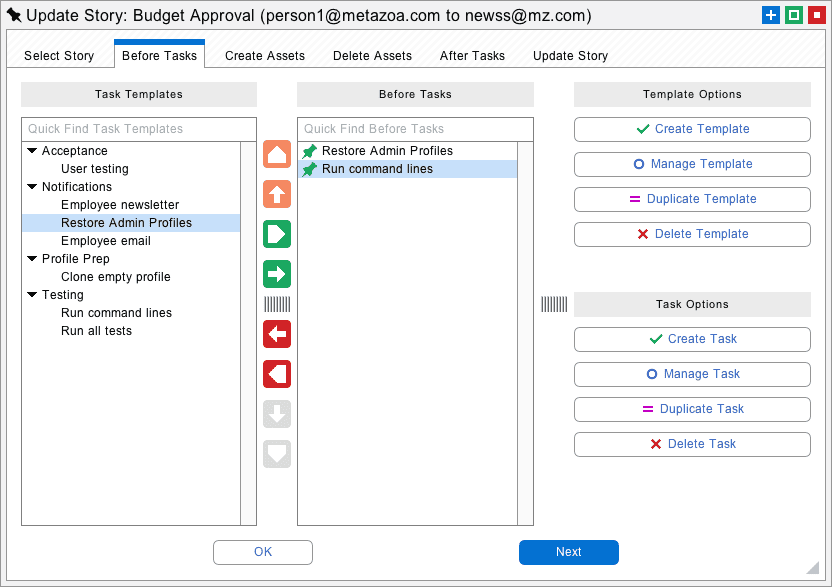
Some deployment tasks are a standard part of any Sprint. For this reason, we have added the ability to create global task templates that can be reused. The templates are visible in the first column and can be edited there. Move a template into the middle column and then it can be customized. You can also create a unique task without a template if desired. You can control the task execution order with the up and down buttons.
Each task contains the option to launch the source or destination Salesforce browser and to run a command line. The browser can be used to start a manual operation with the setup menu. The command line results will be included in the Sprint History when the task is completed.
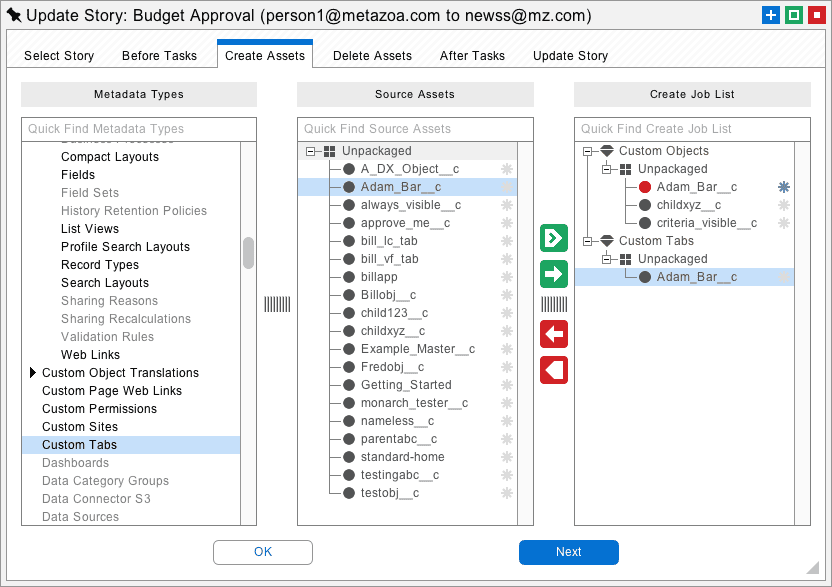
The create and delete assets tabs are very similar to the regular Snapshot deployment interface. One difference is that items on the right-hand Job List will appear in red if they are overlapped with other User Stories in the same Sprint. For example, if Jack is working on the custom object inventory__c and Jill adds a field from that object to her User Story then the field will be shown in red on the Job List. The tooltip for the field will show who else is using the object and the name of their User Story. This overlap might be by design or unexpected. Either way, the create asset interface will notify the team members about any overlaps in the assets that they have selected to work on.
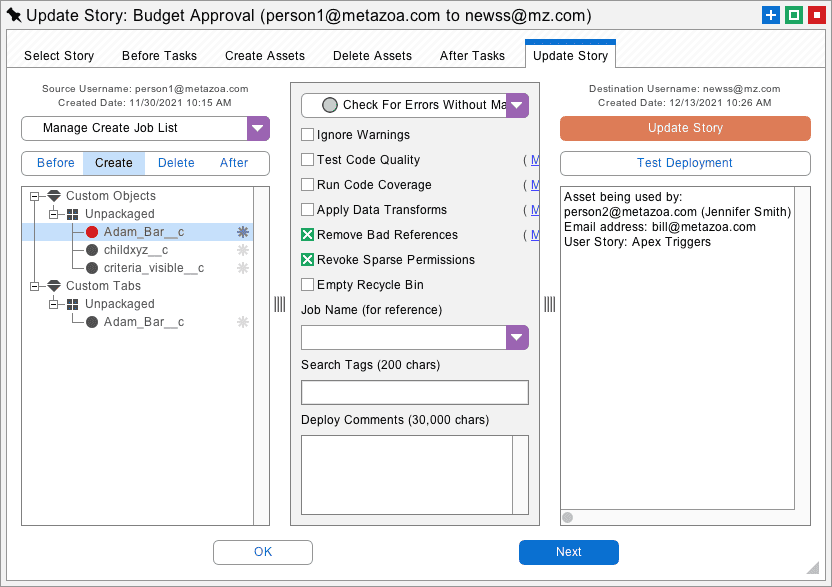
The final tab looks similar to the regular deployment interface. The Update Story button will save all of the selected deployment tasks and metadata assets into the current User Story. The Test Deployment button will conduct a validating deployment using the selected assets against the destination Org. Here is an example workflow. Select the User Story that needs to be updated, proceed through the four tabs to select deployment tasks and assets, test the deployment on the last tab, and then save the User Story.
The Deploy User Stories interface is designed for release managers who need to deploy a Sprint or User Story into an Org, a developer project, or an online repository. This interface could also be used by an individual contributor who wants to move a User Story into a Scratch Org or some other destination. The item connected to the right of a deployment arrow will be the destination for the deployment. Here is first tab of the Deploy User Stories interface.

The release manager can select any Sprint at left and related User Stories from the center column. Any number of Stories can be moved into the right-hand column for deployment. Some Sprints require that all Stories be deployed together, otherwise partial deployments are allowed. If multiple Stories are selected, then there is a potential for overlapping assets and merge conflicts depending on the content of the selected User Stories.
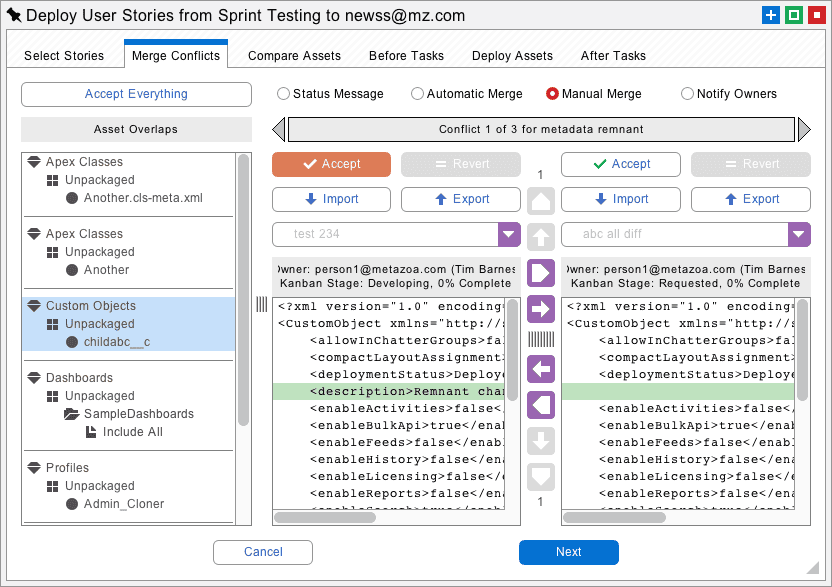
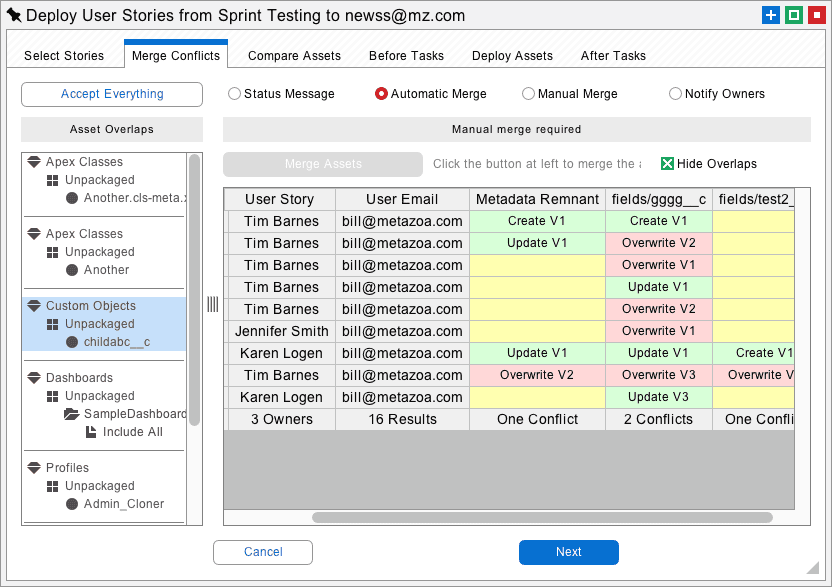
The next tab displays all of the overlapping assets down the left-hand column. When an asset overlap is selected, the interface at right will either show the details of the asset overlap or a merge conflict that must be resolved. If there is a simple overlap, the assets can be merged immediately. This might happen if two different custom fields were added to the same object. There is an overlap, but no conflict.
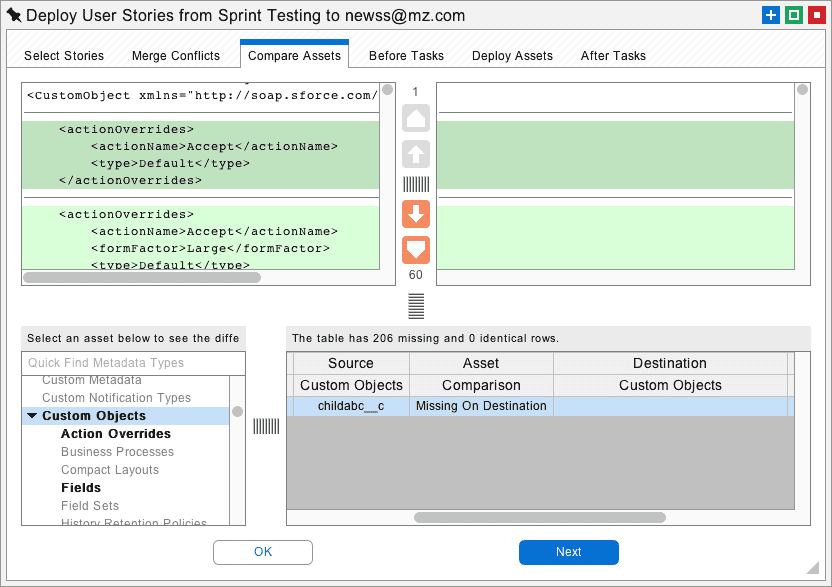
If the two developers are editing the same field, however, then there is a conflict and the manual merge panel will be displayed. In the picture below we can see that one object has a description and the other does not. Since adding a description is nondestructive, the left hand Accept button is automatically highlighted indicating the best way to resolve the conflict. In more complex cases, the buttons in the center can be used to move XML between multiple User Stories. Alternatively, the XML can be imported and exported if necessary. Every aspect of the merge process is guided by the user interface.
At any point the release manager can select the Automatic Merge option and look at the conflict map. This shows all of the component parts of the metadata asset across the top of the screen and all of the conflicting User Stories down the left-hand side of the screen. The number of conflicts in each User Story are displayed by component. This is an important report for understanding and resolving conflicts in multiple User Stories. The conflict map can be exported for review by the engineering team.
In some cases, a release manager might be tempted to send the conflicting User Stories back to the individual contributors and let them figure it out. The Notify Owners button will send an email to the Story Owners, along with an attachment that contains the conflicting asset data and the conflict map. When they are done fixing the conflicts that can make a new pull request to submit their User Stories again.
Some Sprints will not have any asset overlaps, and in other cases the Merge Conflicts interface must be used to resolve problems. When all of the selected User Stories have been merged into a single metadata source, then the release manager can proceed to the Compare Assets tab. This will show the merged source metadata compared to the destination Org. By the way, there is a button available on the first tab that will update the destination Org. This is useful to make sure that the comparison is completely accurate.
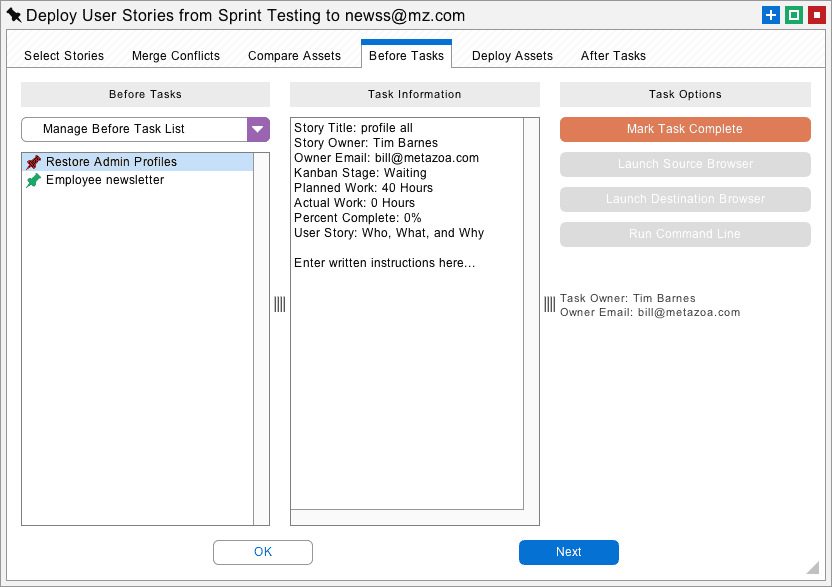
The next tab begins the deployment process for the merged User Stories. First, the before deployment tasks are completed and checked off one by one. In some cases, a deployment task might launch a browser to begin setup menu changes or to run a command line test. When all of the before deployment tasks are completed the release manager can proceed to the next tab and deploy the assets.
The Deploy Assets tab is very similar to the regular deployment interface. You can deploy User Stories into a destination Org, developer Project, or online repository. When you are finished, complete the deployment by completing the after tasks checklist on the last tab.

Every time you complete a User Story deployment the full history of what happened is added to the Sprint History object. This records the list of deployed User Stories, the before and after tasks that were successfully completed, and the results of the deployment. If the Broadcast Sprint Deployments feature was turned on, then these results are emailed to the Sprint Owner. All of this information is available back in the Manage Sprints interface. There is a button called Deployment History on the first tab.
This whitepaper has discussed the best practices for creating Sprints and User Stories with Snapshot. The Snapshot product from Metazoa provides a best-of-breed solution for Org Management with a highly flexible toolset. Click the download button to get the pdf version of this whitepaper.
 Congratulations!