Snapshot provides powerful tools for deploying metadata assets between Salesforce orgs, developer projects, and remote repositories.

Managing a large and complex Salesforce org can be a daunting task. Change and release challenges include moving metadata between multiple environments, unexpected Sandbox refreshes, different Salesforce account types, Salesforce API version skew, dealing with manual changes, and handling large numbers of metadata assets. Native tools such as Change Sets, ANT, Force.com IDE, and the Setup Menu require lots of time and resources.
Snapshot was designed to make the complex task of managing a large Salesforce org much easier. The engineering team at Metazoa has updated the product through 30 versions of the Metadata API. Many of Salesforce’s largest customers use Snapshot for change and release management. In 2018 Metazoa released a major upgrade to the product which embodies more than a decade of accumulated wisdom about how to simplify the task of change and release management for Salesforce administrators.
Snapshot provides highly visual tools for retrieving metadata from any Salesforce account or developer repository. Metadata assets can be moved into a partial or full Sandbox, and after quality assurance and user acceptance testing, deployed into a production org. As part of the migration process, Snapshot provides two dozen security and compliance reports that help you analyze metadata structure, data usage, and account security. This whitepaper is a guide to the best practices for using Snapshot to conduct change and release management operations across a series of connected Salesforce accounts.
Before we get started, let’s have a brief look at the institutions necessary for an effective change and release governance framework. Here are some of the best practices that you may be considering or have already implemented at your company:
Salesforce provides a useful guide on managing change with a governance framework: Many of the capabilities in Snapshot are designed to support corporate governance, compliance, and security practices. Here are some of the features that you can take advantage of for this purpose:
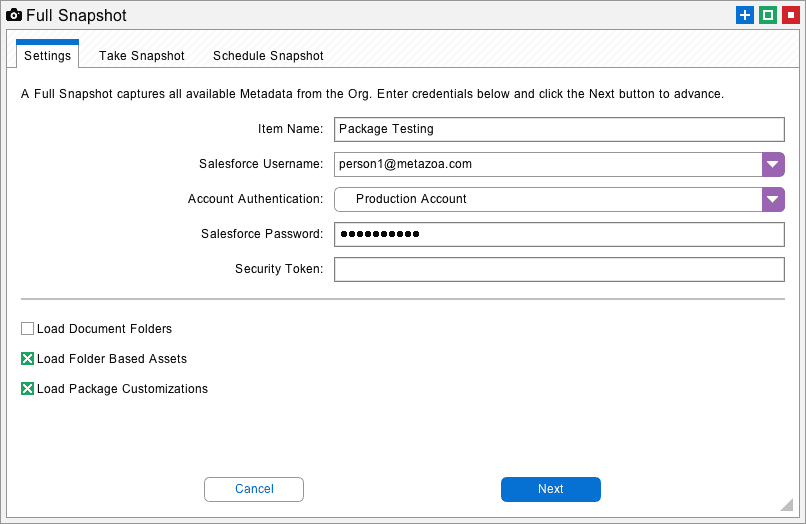
The Full Snapshot dialog will automatically retrieve all of the metadata from any Salesforce org. These metadata assets can be used for reporting and deployment. Simply enter the credentials to any Salesforce org, advance to the next tab, and click the Take Snapshot button. For very large orgs, Snapshot will divide the metadata retrieval process into multiple transactions and then reassemble everything for a comprehensive picture.
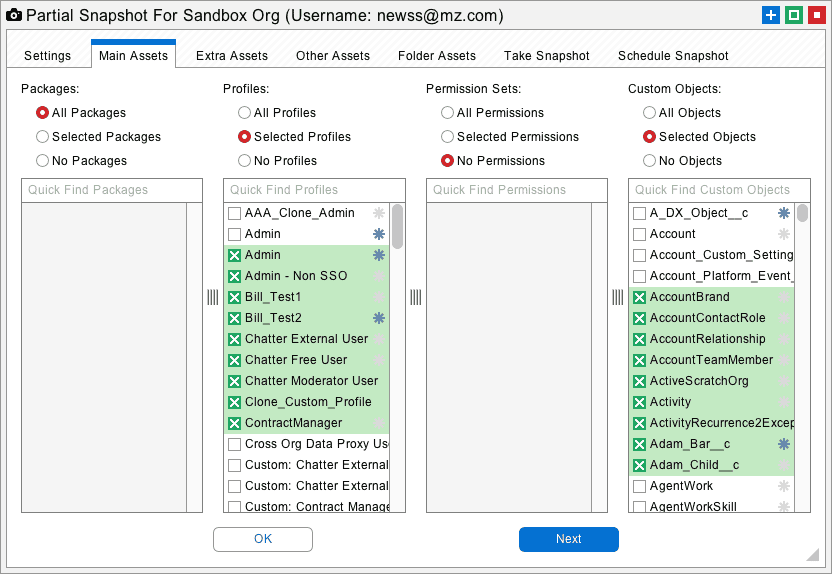
Sometimes you only need to retrieve certain assets from the org. The Partial Snapshot interface can be used to select metadata assets individually. These assets include: Packages, Profiles, Permission Sets, Custom Objects, Roles, Groups, Queues, Custom Object Translations, Page Layouts, Apex Classes, Apex Pages, Dashboards, Reports, Email Templates, and Documents. All the other metadata assets types are available in a “catch-all” list for quick selection.
There is also an Append Snapshot dialog that will add any missing or new assets to an existing Snapshot. The last tab in all of these interfaces can be used to schedule when Snapshots are automatically taken. This is an easy way to set up security monitoring and metadata backup for any number of orgs.
Each time you take a new snapshot, the old snapshot is not destroyed. In fact, all of the previous snapshots are maintained in a time series. You can use the Manage Time Series dialog to view all of the recorded snapshots through time. Any one of the older snapshots can be targeted for reporting or migration. Simply select the desired snapshot and click the Target button. The automatic storage of time series snapshots is a key feature for compliance.
All of the differences across the time series can be viewed and reported on in the Compare Time Series tab. This provides an easy way to actively monitor any section of metadata for changes. If a change is detected, a comprehensive difference report can be mailed out to team members. This capability can be used to document progress on a specific development project or trigger an alert when metadata is changed for any reason.

Snapshot can download metadata assets from any Salesforce org. Sometimes metadata assets reside in an online repository or a local file folder. A change and release manager might receive developer assets by email and save them into a folder. Or a developer could provide a link to an online repository with their latest project. The folder might contain a Salesforce DX project or some other collection of metadata asset files. Snapshot has Developer Projects to help with situations like this.
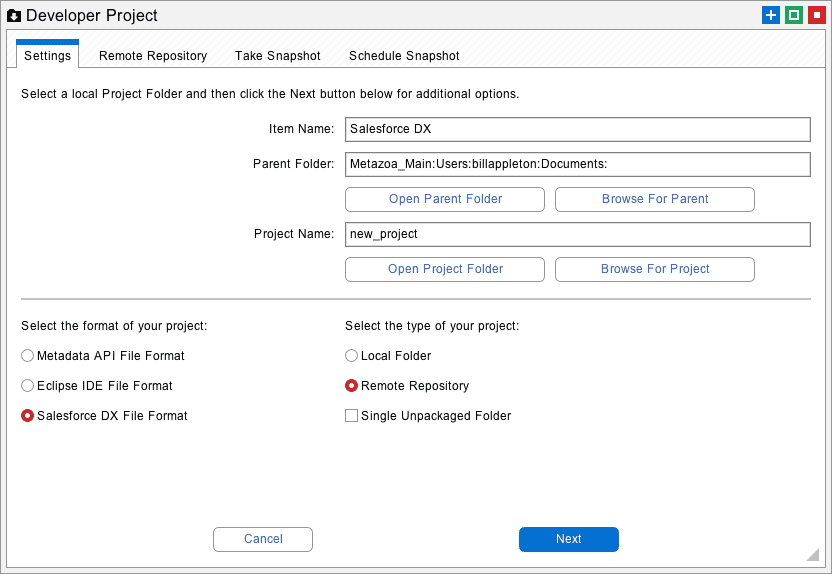
Each project folder contains metadata source files. The files can be in Force.com IDE, the Metadata API, or Salesforce DX format. Snapshot will parse the file and folder structure and figure out how to harvest the metadata. The project folder can be located on the local machine, a shared drive, or an online repository. Snapshot supports any Git repository like GitHub, GitLab, BitBucket, or Azure DevOps. The connection to the repository can be set up and tested with the Developer Project dialog.
When you update a developer project, the files are downloaded from the repository (if necessary) and then harvested just like a regular snapshot. One difference is that, because the developer project is not connected to an actual Salesforce org, some data usage and security reports are not available. You can deploy metadata between connected Developer Projects and Metadata Snapshots. The developer project and associated repository can be either a source or a destination for deployment.
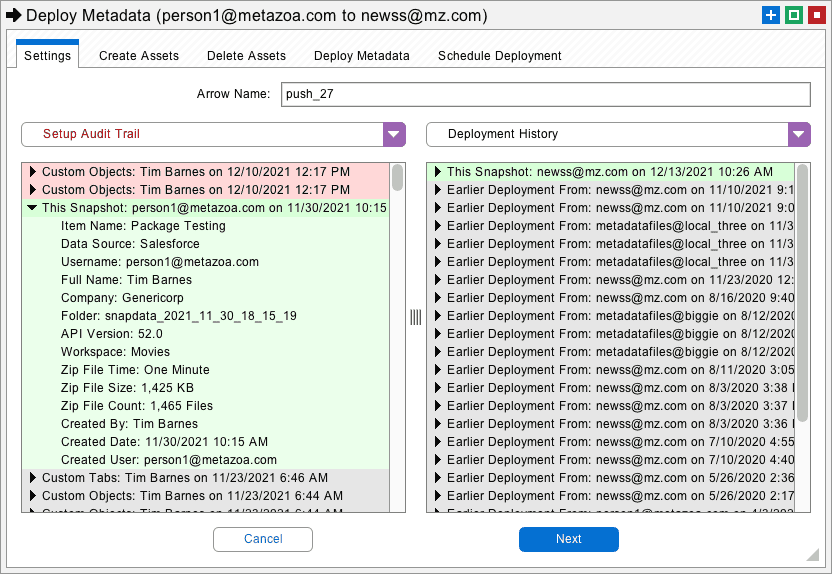
Once you have a source and destination snapshot, you can double-click the deployment arrow to move metadata from the source to the destination. The first screen you see will show you the state of the source and destination snapshot. This includes Setup Audit Trail and Deployment History information. If the source or destination snapshot is out of date, you can take another snapshot immediately from this interface. This capability guarantees that multiple team members working in an active org are not overwriting each other’s metadata, and also that the current snapshot being deployed and the destination snapshot being compared are up to date.
Next, you will need to build Job Lists for the metadata assets that you want to create and delete. The Metadata API always deletes and then creates some assets in each transaction, so that is why the user interface is organized in this fashion. You can also just create or just delete assets if desired.
The left-hand column shows all of the metadata types that are available. The disabled types were not captured by the current snapshot. The middle column shows the assets for the selected type that are available to be added to the Job List. The right-hand column shows the assets that have already been selected for the Job List.
Notice that the middle column marks each asset with a grey circle, red triangle, or green plus icon. The assets marked with a grey circle are the same in the source and destination. The assets marked with a red triangle are different in the source and destination. The assets marked with a green plus are only available on the source and are missing from the destination. The slide-down panel at the top of the screen shows the line by line differences between the currently selected assets.
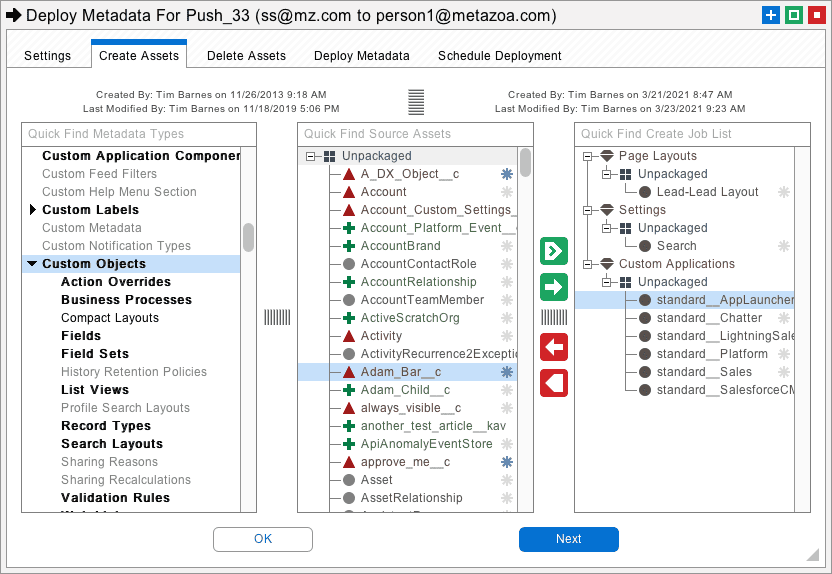
The buttons in the lower right change based on what is selected. You can move an asset into the Job List, remove an asset, move all assets, or remove all assets. Other options include the ability to move only different or missing assets. Lastly, you can move assets and all related metadata types. This is useful for grabbing additional types that would otherwise cause the deployment to fail.
The next tab lets you select assets for deletion. The Create Job List will contain assets gathered from the source snapshot, and the Delete Job List will have assets gathered from the destination. Either one of these Job Lists can be empty. After assembling the Job Lists, the Deploy Metadata tab can be used to push them into the destination org. After each deployment, you can go back to the previous tabs and further refine the Job Lists and continue with additional deployments.
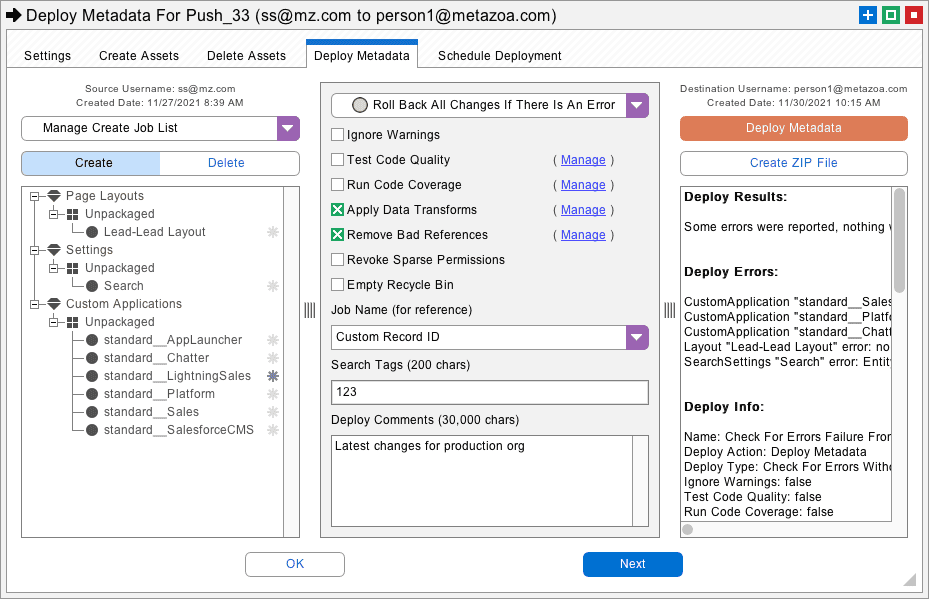
On the left-hand column, you can see the Create and Delete Job Lists. The Manage Job Lists button will allow you to import and export Job Lists, as well as browse for previous Job Lists that you or your team members have used while working on this org. Sharing the Create and Delete Job Lists reduces errors and provides a simple way to orchestrate deployments. The middle column has powerful tools to help with deployment:
The Test Code Quality checkbox will conduct static analysis of Apex code and optionally stop the deployment if problems are encountered.
The Run Code Coverage checkbox allows you to select Apex tests that are run prior to deployment. This is useful for achieving 75% code coverage or setting up a Quick Deploy, discussed below.
The Apply Data Transforms checkbox allows you to transform data values before deployment. For example, you could remap a username from the source to the destination org to enable the successful migration of a Report or Workflow.
The Remove Bad References checkbox can prevent many problems from happening in a deployment. This option scans Profiles, Permission Sets, Page Layouts, Custom Objects, and Reports. Any references to assets that are not available in the destination org or included in the current Job List are automatically removed.
The Revoke Sparse Permissions checkbox will replace sparse Profile permissions with negative values that revoke the corresponding privileges on the destination org. This guarantees that privileges are revoked properly when Profiles are deployed.
The Job Names, Search Tags, and Deploy Comments can be any text string that you want to include for compliance purposes. These values and all of the other information about the migration are written out to the Deployment History custom objects after the push. These objects can also be used for creating reports in the Salesforce HTML interface.
Lastly, the right-hand column has the Deploy Metadata button. Click this button to conduct a Validating, Transactional, or Partial Deployment. When the deployment finishes, there is a human-readable report displayed in the results box below. The results box will also contain information about any references that were removed.
The menu at the top of the Deploy Metadata dialog provides three options:
Validating Deployment: This option will check for errors without making changes. The deployment is simulated, and no changes are actually made to your Salesforce org. All success and error messages are displayed in the results box.
Transactional Deployment: This option will roll back all changes if there is an error. If there are any errors, the entire deployment is rolled back, otherwise all assets will be deployed. All success and error messages are displayed in the results box.
Partial Deployment: This option will change everything possible and ignore errors. Assets that cause errors are rolled back, but other assets continue to deploy unless there are cascading errors. This option is not available for production orgs.
When you are deploying assets to a production org, you must use a Transactional Deployment. This option has the advantage of rolling back all changes if there is an error. Sometimes for more complex migrations, you will need to make multiple deployments. The order of operations for multiple deployments is discussed in the next section. Here are a few best practices to keep in mind when deploying to a production org:
The best strategy for complex deployments is to start with assets that have few dependencies. We recommend that you push metadata assets in the following order when conducting multiple deployments.
* This will push all Object fields plus the related settings including: Business Processes, Compact Layouts, Fields, Field Sets, List Views, Record Types, Sharing Reasons, Validation Rules, and Web Links. These settings can also be pushed individually if needed.
** Users tied to workflows must be created in the destination org prior to deployment. Select the Apply Transforms checkbox to automatically change usernames or other values prior to deployment.
*** This will push all Profile metadata plus the related settings including: Apex Classes, Apex Pages, Custom Applications, Custom Objects, Page Layouts, Custom Tabs, and User Permissions. These settings can also be pushed individually if needed. If you would like to automatically remove any references to assets that do not exist in the destination or in the Job List from the profiles, select the Remove Bad References option.
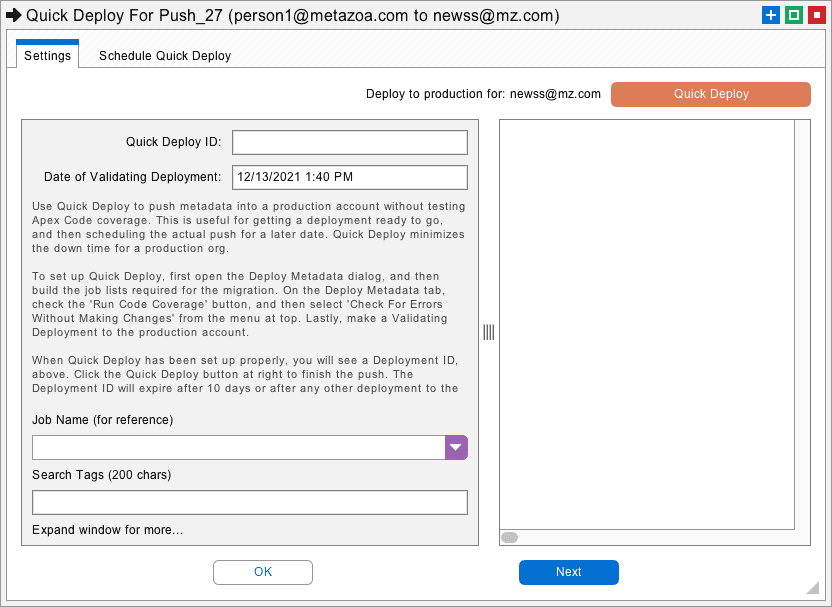
If you conduct a Validating Deployment that runs Unmanaged Tests for code coverage, then you can execute a Quick Deployment instead of the longer Transactional Deployment. A Quick Deployment enables you to schedule deployments to production with more confidence because you know the deployment will succeed and requires a shorter window of time. A Salesforce service update is also less likely to interrupt a Quick Deployment.
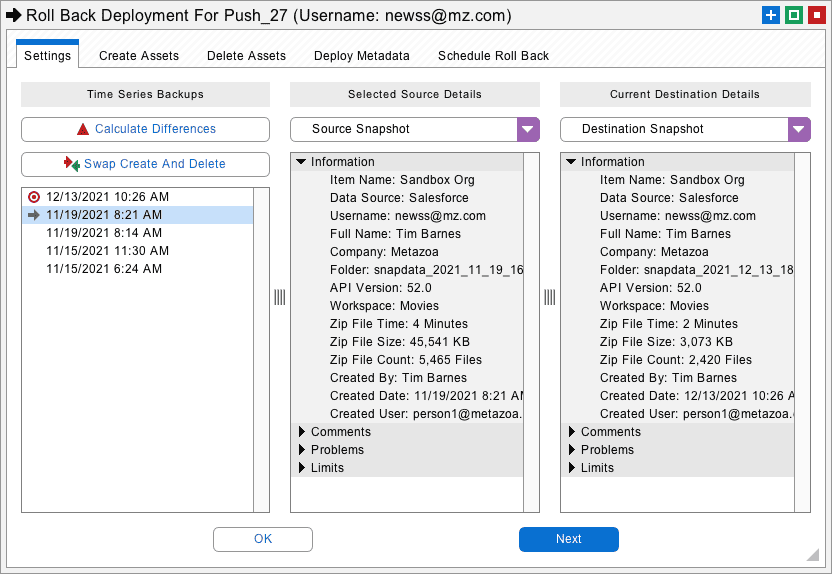
The Roll Back Deployment dialog uses time series snapshot data to restore the destination org to an earlier date. Any one of the earlier snapshots can be selected as the source. The destination org can be refreshed and continually compared to the source until everything has been restored.
The Calculate Differences button will calculate all of the differences in the source and destination org to assemble the Create and Delete Job List. In some situations, you will get better results with the Swap Create and Delete button. In that case, the time series of earlier Job Lists are merged and flipped. Often you will only need to restore some part of a deployment. This dialog documents all of the changes and the historical Job Lists in one interface.
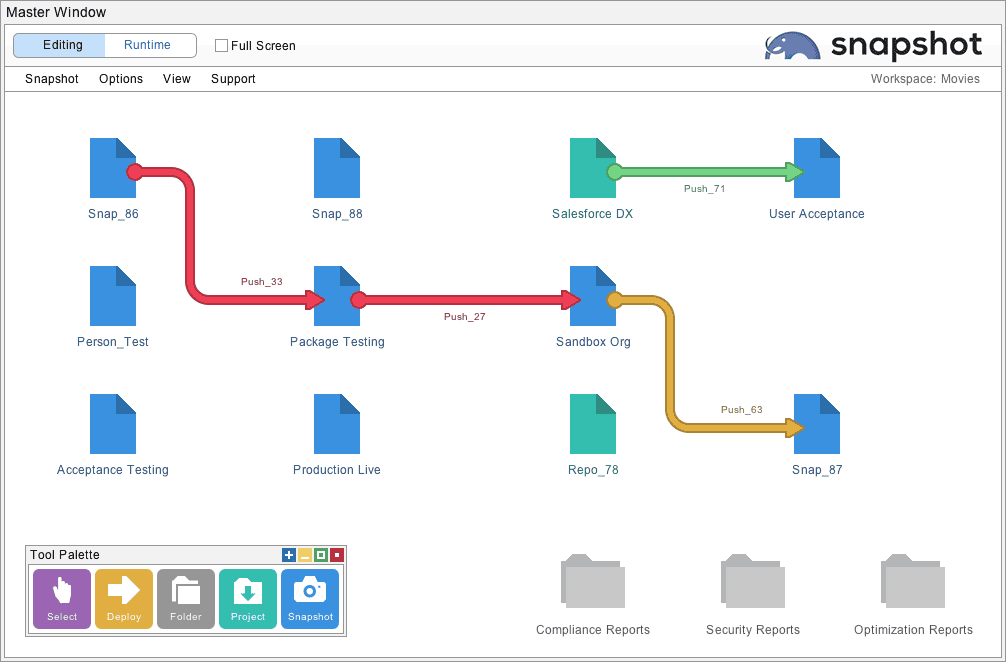
Snapshot provides tools to create a visual map of your Salesforce release environment. In the example below, there is a developer project and a Developer Edition org connected to a partial Sandbox, which in turn is connected to a production org. All of the snapshots and metadata deployments on the desktop can be scheduled and automated as needed.
The Snapshot desktop provides a visual guide to metadata flows from the source to destination. Your implementation might be more or less detailed depending on your process and needs. The Snapshot desktop provides a flexible way to rewire your release environment over time and accommodate new projects and reports.
This whitepaper has discussed the challenges that companies face with change and release management on the Salesforce platform. The Snapshot product from Metazoa provides a best-of-breed solution to enable effective release management through streamlined deployments, reporting, and compliance. Click the download button to get the pdf version of this whitepaper. There is also a case study available for metadata deployment.
 Congratulations!