Snapshot can view, edit, compare, and document Profiles and Permission Sets for compliance and security.

Profiles and Permission Sets control what users can see and do in their Salesforce org. Managing these permissions is an essential activity to ensure data security and keep the org running smoothly. But as orgs grow, the number of permissions can skyrocket, and management can become more and more difficult. Our Snapshot product offers best of breed tools for managing Profiles and Permission Sets and for helping Salesforce Administrators visualize the complexity in their org for compliance and security.

This whitepaper covers technical information about Profiles and Permission Sets as well as the best practices for managing these assets. The next section discusses how to capture complete Profile and Permission Set information in large Salesforce orgs. After that, we present the tools that Snapshot has for viewing, editing, and comparing Profiles and Permission Sets. The last section covers the reports that Snapshot provides to document Profiles and Permission Sets for compliance and security.
There are 250 different Metadata Types that can be captured in a Snapshot of a Salesforce org. For example, you might download Apex Classes, Custom Objects, Page Layouts, or Reports and Dashboards. These assets are retrieved by the Salesforce Metadata API when you take a Snapshot. However, Profiles are handled somewhat differently than other assets. The information you get when a Profile is captured depends on the other assets that you download along with the Profile. Profiles are “entangled” with these other assets:
Administrators of large and complex Salesforce orgs may have difficulty downloading all these assets in order to capture complete Profile information. For example, an org might have 500 Profiles and 1000 Custom Objects with an average of 500 fields for each object. In this case, roughly 250 million Field Permissions will be downloaded. Each Field Permission is an XML snippet that takes up about 250 bytes. That means that the total size of the downloaded data will be over 50 GB.
Objects and Field Permissions are the worst case, but large numbers of Apex Classes and Page layouts can also cause gigantic Profile downloads in complex orgs. This problem is compounded by the fact that the Salesforce Metadata API can only download 10,000 assets at once, and the size of the download is limited to about 400 MB of decompressed data. In large orgs there might be over 10,000 Apex Scripts alone, and so the Metadata API limits can also prevent download of comprehensive Profile information.
If your org is not very big then you don’t need to worry about this issue. The Full Snapshot dialog will figure out how to download all the metadata in your org. For larger orgs, this interface will automatically divide the metadata retrieval process into multiple transactions and then reassemble everything for a comprehensive picture. The rest of this section discusses Profile retrieval for very large orgs. Some readers may want to skip this section.
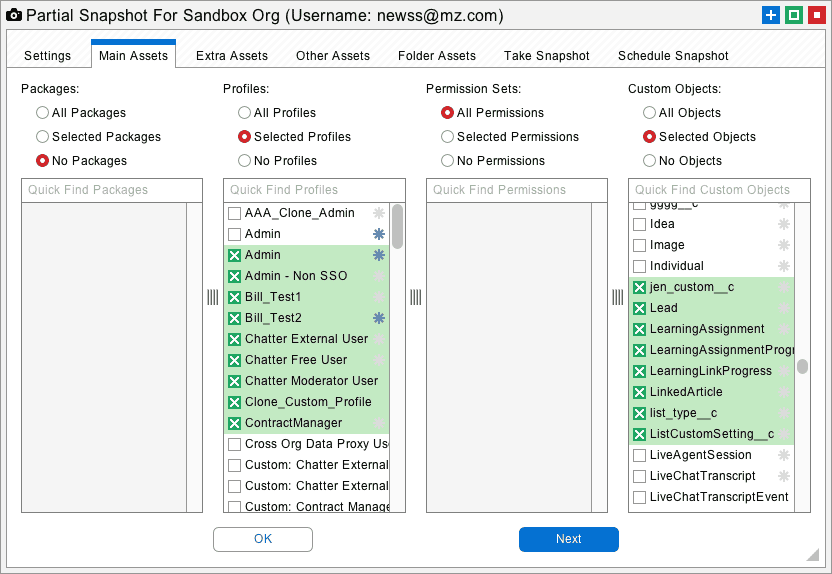
In very large orgs, the metadata retrieval process can take a long time. Another possibility is that you might want to focus on a subset of your Profile information. The Partial Snapshot dialog can be used to select just the Profiles and other entangled assets that you want to work with. The picture below shows a subset of Profiles and Custom Objects selected for download.
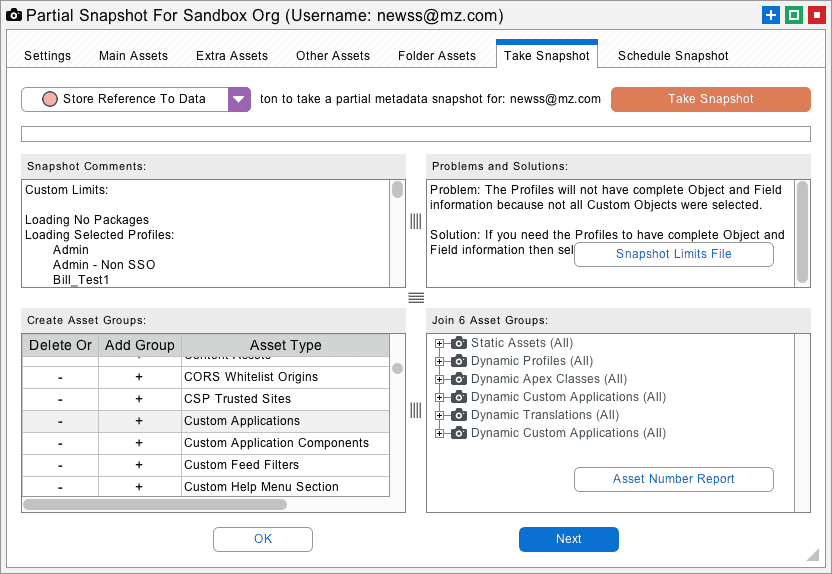
There is an interface at the bottom of the Take Snapshot tab that will control what asset groups are downloaded. The rule here is simple: If you have lots of assets, then add some groups. For example, if there are 10,000 Apex Classes in your org, then add a few groups there. We do not recommend adding multiple groups of Profiles. Just add groups of the entangled assets. That way all of the assets are downloaded only once.
The Partial Snapshot dialog has some other tools that will help you understand where the problems might be when you want to download all your Profile data. The Asset Number Report button shown below will scan the org and tell you the total number of assets in each Metadata Type. On the first tab, you can also click the Display Number of Selected Assets checkbox to display the number of assets throughout the interface. If you right-click the table at left, there is an option to Auto Calculate the number of asset groups. This will provide a good starting point for grabbing the selected Profile information.
Once you have selected your asset groups, this information will be automatically remembered in the Partial Snapshot interface and reused each time you take a Snapshot. If the Metadata API is taking too long to capture this information, then you can also schedule a Snapshot on the last tab. Some administrators set up a Virtual Machine and run Snapshot there so that they can run this process at night if necessary. Once you have captured the information that you need you can move on to the next steps outlined below.
Right-click your Snapshot and select View Profiles or View Permission Sets. This will bring up an interface to view and edit these assets. Each table will show the Profiles or Permission Sets down the left-hand side and one of the child assets across the top. You can select any of the different views from the menu at right, including:
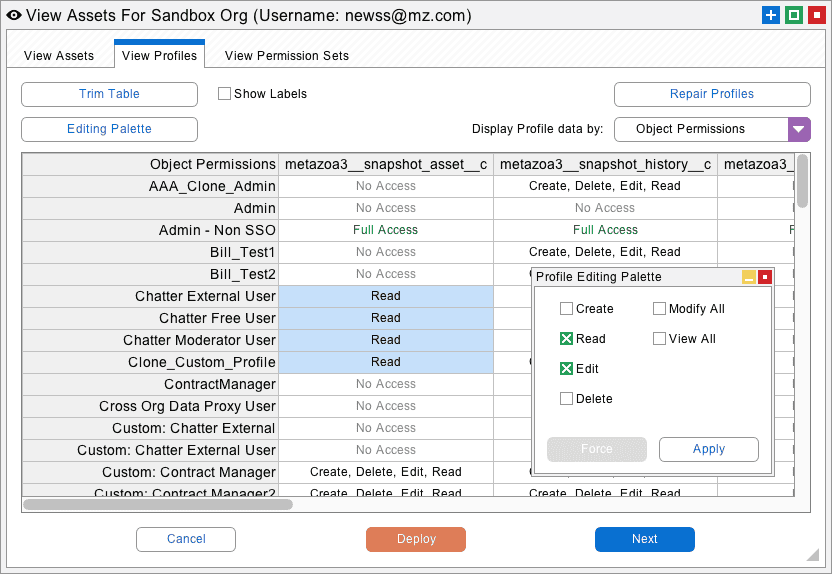
The Trim Table button at top will allow you to select a subset of the table. This is useful if you want to focus on a particular group of Profiles or Permission Sets. Remember that you can right-click on the table and export the current view as a PDF, HTML, or CSV report. This interface also provides the ability to edit any of the cells. Click the Editing Palette to edit the cell values. When you make edits, a Deploy button will appear at the bottom of the screen. Click this button to bring up the Smart Deploy interface. You can deploy your edits to the org from there, or you can export the Job List and deploy the changes as part of the release management process later. Deployment issues are discussed in the next section.
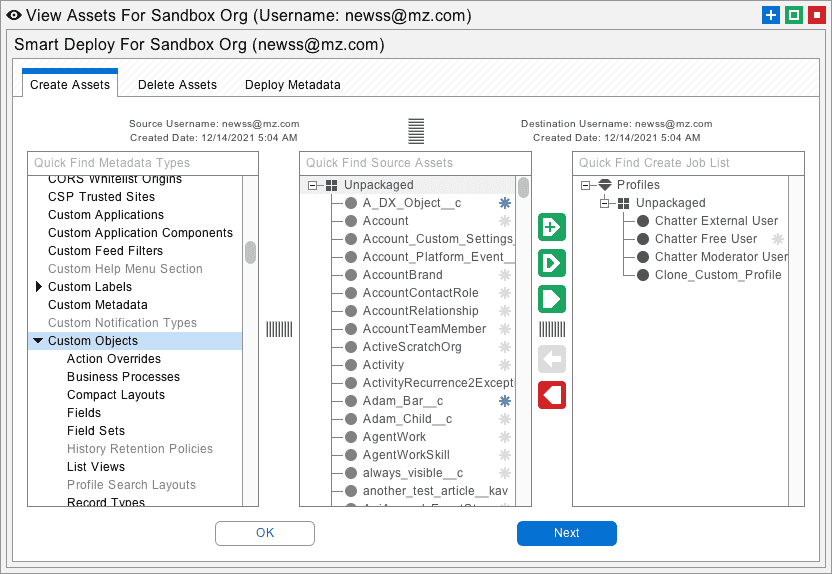
Profiles and Permission Sets can easily be moved between orgs. Be sure the orgs are connected by a deployment arrow on the Snapshot desktop. Right-click the arrow and select the Deploy Metadata option. You can either move the entire Profile or some of the individual permissions in the Profile. This is super useful for making targeted permission changes. For example, in the picture below, a single Object Permission has been added to the Create Job List.
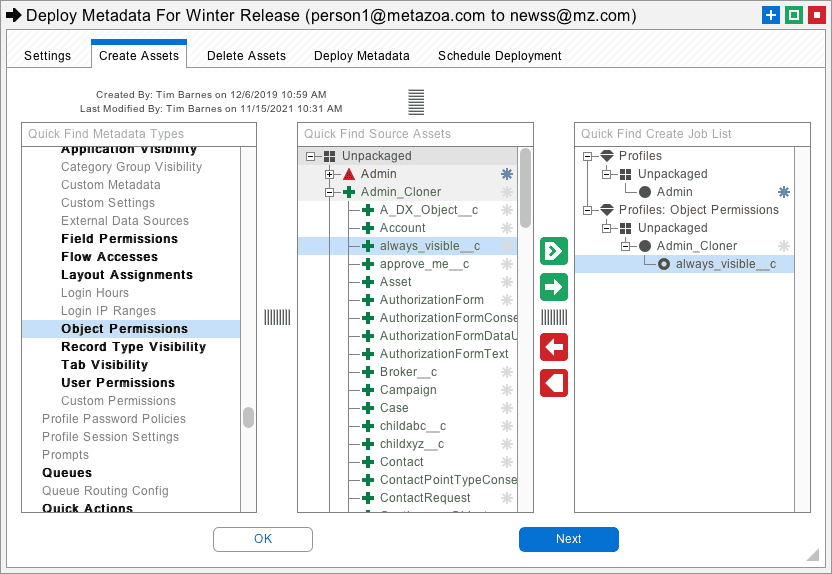
By the way, if you right-click the Create Job List or Delete Job List in the picture above, there are options to add Profile permissions to the currently selected assets. This is very useful if you are moving something like Custom Objects to a destination org and want to be sure that you have access rights for the objects after deployment.
When you deploy permissions, you will also have to be sure that dependencies like Apex Classes and Custom Objects are available on the destination org. You can include these assets along with the permissions in the Create Job List if necessary. Otherwise the deployment will fail. This is a common problem in Profile and Permission Set deployments.
The Remove Bad References checkbox on the Deploy Metadata tab will automatically remove missing references from Profiles and Permission Sets. In other words, if you are deploying a permission and the associated asset is not on the destination org or in the current job list then this option will automatically remove that permission during deployment. If you want to catch these errors instead, then uncheck the Remove Bad References option.
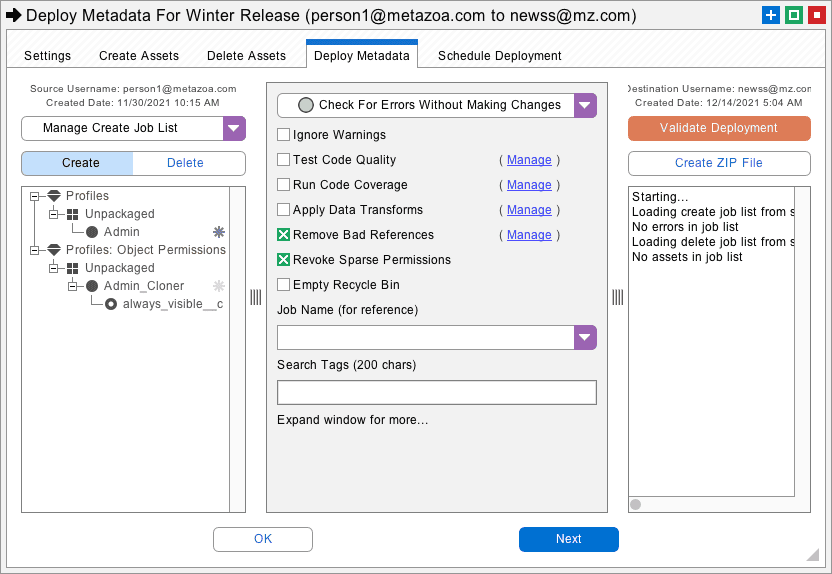
By the way, the Remove Bad References option can come in handy if you are having trouble with Profiles that reference standard assets. Standard assets cannot be created, deleted, or migrated. Click the Manage button next to the Remove Bad References checkbox, add the name of any standard asset to the list, and that asset will not be included in the deployment.
The Revoke Sparse Permissions checkbox fixes another important problem that can happen during deployment. Some permission types only include positive information about rights that should be granted. They do not include negative information about rights that should be revoked. When these permissions are deployed, the positive rights are granted, but the missing negative rights are ignored. The Revoke Sparse Permissions option will generate this negative information to make sure that all permissions are properly revoked during deployment. Examples of sparse permissions include Object Permissions, Tab Visibilities, and User Permissions.
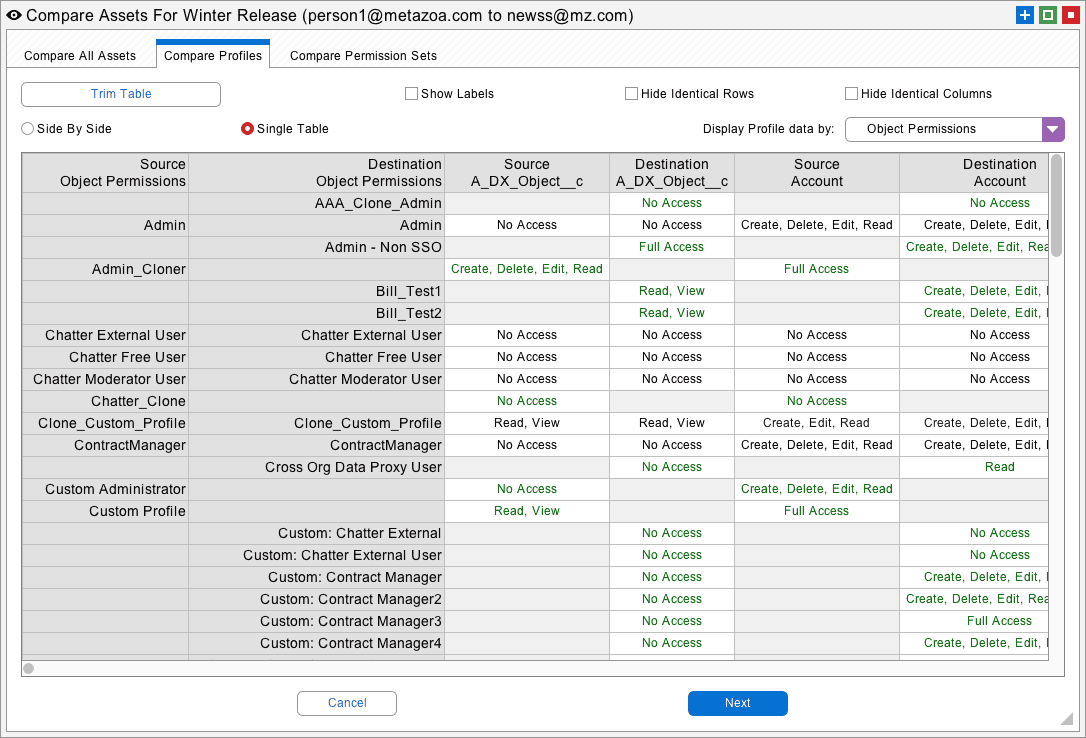
If you right-click the deployment arrow you can also choose to Compare Profiles or Permission Sets. This will line up the source and destination permissions and present the differences. You can switch between Side by Side and Single Table views. The single table view is very useful for HTML, PDF, and CSV export, because all of the differences are in a single report. You can also use the Trim Table button to focus in on specific rows and columns for comparison. There are also options available to Hide Identical Rows, Hide Identical Columns, and Show Labels on this interface.
Right-click any Snapshot item to see the Profile and Permission Set Reports. Information about Permission Set Groups is also included. The Permission Set Groups properly show the rollup of all included Permission Sets with Muting Permissions properly removed. These reports can be configured and scheduled to run like other Snapshot reports. Here is a list of all the reports:
Profiles
Permission Sets
Permission Set Groups
Combined Security
The Combined Security reports works with a group of selected users. Right-click the report table to select the users for the report. There is also a button to Select Users on the Display Report tab. The report will show the Profile for each user, and then how this base permission was modified by all the Permission Set Groups and Permission Sets that were assigned to the user. If the base Profile permissions were modified, then the table cell is coded in green. If the base Profile permissions were not modified, then the table cell is coded in red. This report is very useful in documenting the true security permissions that users have been granted.

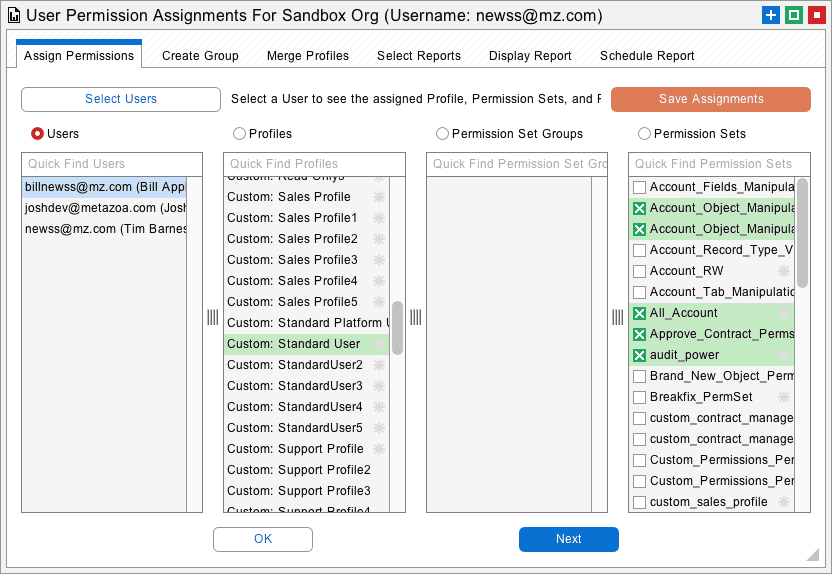
Snapshot has another editing and reporting interface called User Permission Assignments. This feature allows all the User Assignments with Profiles, Permission Sets, and Permission Set Groups to be rapidly edited. You can also report on all these relationships for backup, security, and compliance. The goal here is to reduce the reliance on Profiles and move some of that complexity out into Permission Sets and Permission Set Groups.
The next tab in the dialog allows related Permission Sets to be selected and automatically bundled up into a Permission Set Group. All the Users are reassigned so that there is no change in actual permissions. After that, there is a tab to Merge Profiles. You can select a set of related Profiles that you would like to merge, and then see the number of new permissions that will be required. Click the Merge Profiles button to generate a new base Profile, create new Permission Sets that make up the differences, and then optionally reassign all the Users.

There you have it. Snapshot provides very powerful tools for working with Profiles and Permission Sets. These tools are designed to help Administrators clean up and manage complex Salesforce orgs. Let us know if you have any trouble with your org. Click the download button to get the pdf version of this whitepaper. There is also a case study available for permission set management.
 Congratulations!