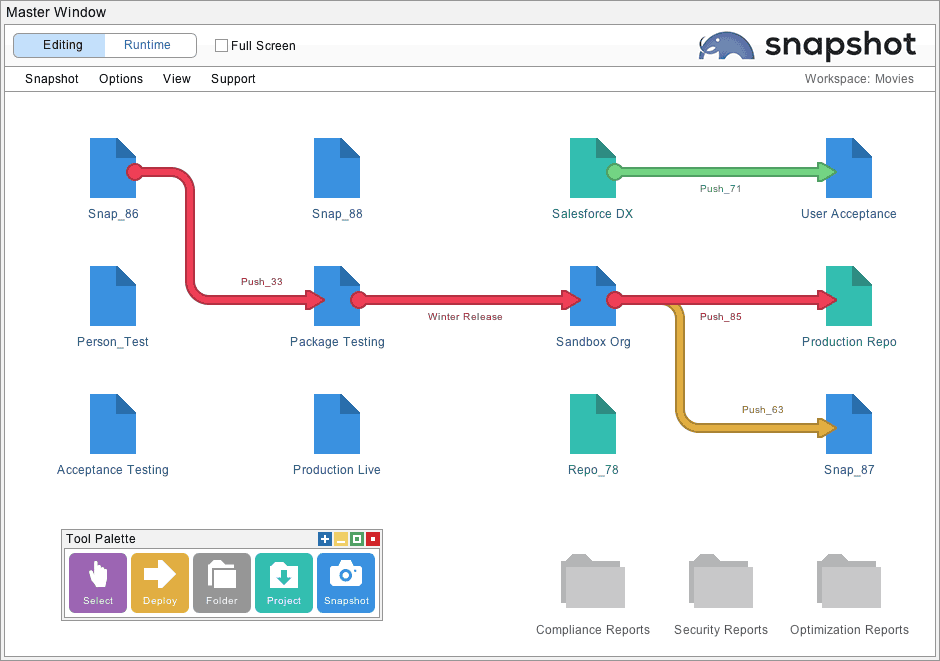
Snapshot can synchronize Salesforce orgs, developer projects, and content repositories with continuous integration.

Snapshot provides sophisticated and flexible tools for continuously keeping Salesforce accounts, developer projects, and content repositories synchronized. A wide variety of different use cases can be implemented by simply connecting items on the desktop and turning on continuous integration. Developer projects and content repositories can be in either Force.com IDE, Metadata API or Salesforce DX format. The different types of metadata deployments and continuous integrations that are possible include:
Salesforce Org → Salesforce Org
Salesforce Org → Developer Project
Salesforce Org → Content Repository
Developer Project → Salesforce Org
Developer Project → Developer Project
Developer Project → Content Repository
Content Repository → Salesforce Org
Content Repository → Developer Project
Content Repository → Content Repository
This white paper discusses the different types of developer projects that are available and how developer projects can be configured for continuous integration. Next, we look at the two main styles of continuous integration. The first is triggered by changes in the source, and the second is triggered by deployments. Lastly, we cover ways to schedule continuous integrations, and how to set up a dedicated Snapshot server.
Snapshot is a desktop client technology, much like Salesforce DX or Visual Studio. Because of this, developers can work with the local file system, the command line, the Salesforce HTML interface, Scratch Orgs, and Snapshot all at the same time. Snapshot can launch all of these interfaces from the desktop, just right-click any item and select the desired application at the bottom of the options menu.

Each developer project is associated with a local folder in Force.com IDE, Metadata API or Salesforce DX format. Each project can optionally be associated with a content repository like GitHub, GitLab, BitBucket, or Azure DevOps. Select a parent folder and project name in the top part of the Developer Project dialog. Configure one of the six types of developer projects from the radio buttons below. The six types of projects are:
A developer can populate any local folder with metadata files. Normally the first level of folders will be packages, including a folder for unpackaged assets. Inside each package folder will be the familiar Metadata API folders such as Classes, Objects, etc. Inside those folders will be documents with Metadata API file extensions. This is the raw format returned by the Metadata API Retrieve call. The format for the Force.com IDE is similar, except that packaged are stored in the “referenced packages” folder and unpackaged assets are stored in the “src” folder.
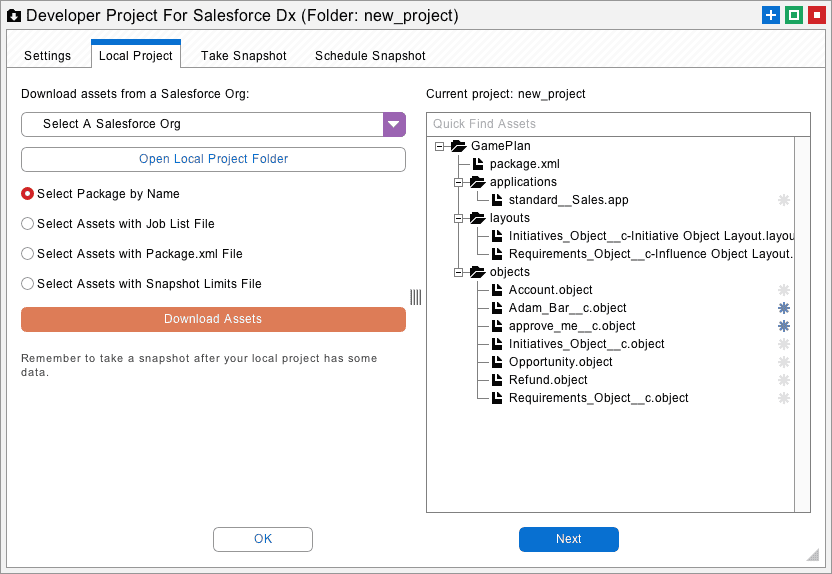
The first tab for a local project has an interface to help populate the folder. There are options to download assets by package name or to select them with a Job List file, a Package.xml file, or a Snapshot Limits file. Choose one of the options and click the download assets button to populate the local folder. Here are some additional notes on all of the different ways to populate a local project with metadata files:
Packages: The download assets button brings up a list of packages with “unpackaged” at the top of the list. Select a package to replace the current folder contents.
Job List: The download assets button prompts for the selection of a Job List file. These text files show the various assets selected in the create or delete job list, and they can be exported from the Deploy Metadata interface.
Package.XML: The download assets button prompts for the selection of a Package.xml file. These XML files are part of any Metadata API Retrieve call.
Snapshot Limits: The download assets button prompts for the selection of a Snapshot Limits file. These files are created by the Take Snapshot dialog.
Local projects in the Force.com IDE or Metadata API format usually have all their files and folders in a predefined format. However, you can also throw random asset files and folders with any name into the project folder. When you take a snapshot of the developer project, Snapshot will figure out what assets are there and use them if possible.
This feature is useful for ad-hoc projects or importing existing metadata stored in an unknown format. However, if you deploy assets to a free-form project folder, then the files will be stored in the regular Force.com IDE or Metadata API format. For this reason, free-form project folders are more useful as a source of metadata rather than a destination.
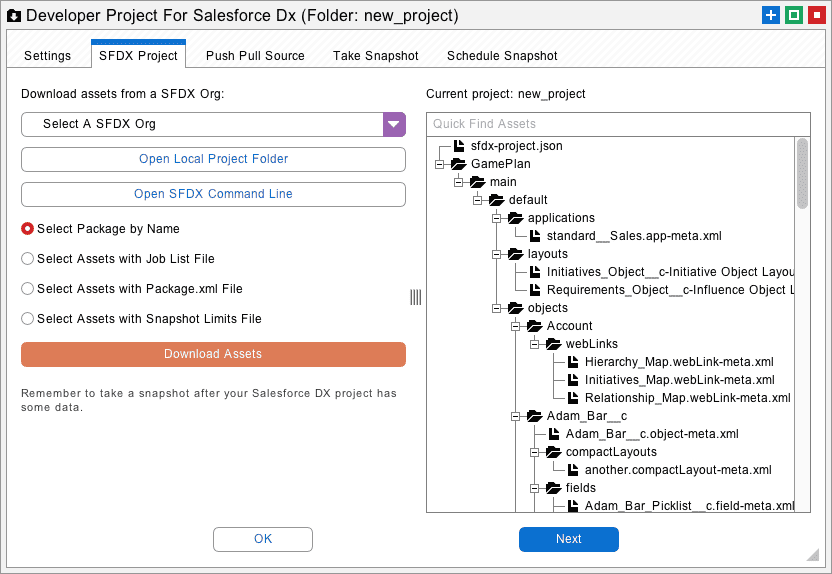
Salesforce DX is a command line technology, and Snapshot can leverage all the capabilities available in Salesforce DX through direct integration. This enables local folders in Salesforce DX format to have some additional capabilities beyond a regular developer project. The first screen also provides tools to populate the Salesforce DX project with metadata. If you right click on the files displayed at right, you can create source code for a variety of objects. You can also open the local folder or launch the command prompt. Developers can use the command line to edit with Salesforce DX or other desktop tools. Here are the source code assets that you can create from the Snapshot interface:
The next tab allows you to push and pull source code from Scratch Orgs. Select an existing Scratch Org or create a new one from the menu at top. The list at right will update with information about local assets in the project folder that could be pushed to the Scratch Org, and remote assets in the Scratch Org that could be pulled down.
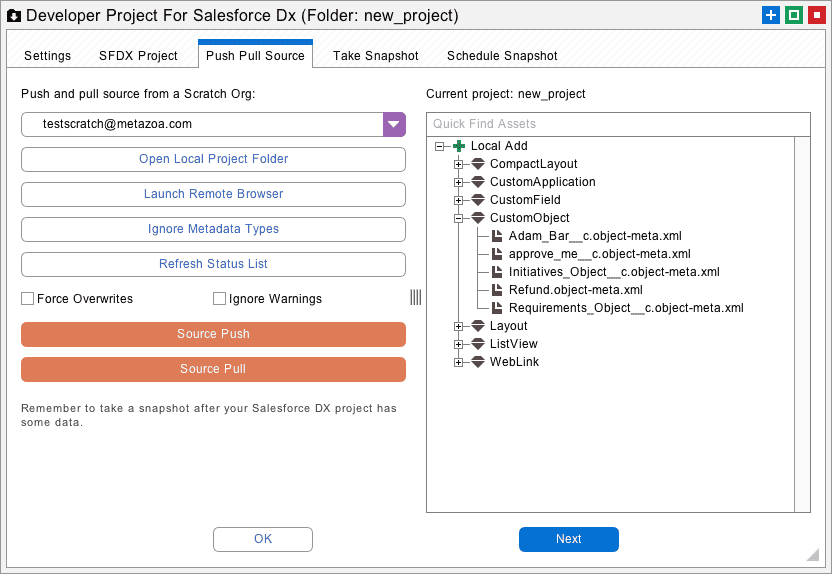
Here is additional information on all of the options:
Select Scratch Org: Manage all of your Salesforce DX Dev Hubs, Connected Orgs, and Scratch Orgs. New Scratch Orgs can be created with this menu interface.
Open Local Project: Launch the local project and edit with the file system or other tools. These changes can be pushed to the Scratch Org with the Source Push option, below.
Open Remote Browser: Launch the currently selected Scratch Org in a browser. Make changes in the remote org for the Source Pull option, below.
Ignore Metadata Types: Select metadata types that will be ignored during a Source Push. This can help developers focus on certain types like Custom Objects or Apex Classes and ignore other types that might not be easy to deploy, like Profiles.
Refresh Status List: When local or remote changes have occurred, refresh the status list at right. This will display the local and remote differences between the project and Scratch Org. Sometimes conflicts occur, in which case the Force Overwrites option can be used to resolve them on the local project or remote Scratch Org.
Source Push: Deploy any local adds to the currently selected Scratch Org. The status list will update after the metadata deployment.
Source Pull: Retrieve any remote adds from the currently selected Scratch Org. The status list will update after the metadata is retrieved and the local project is updated.
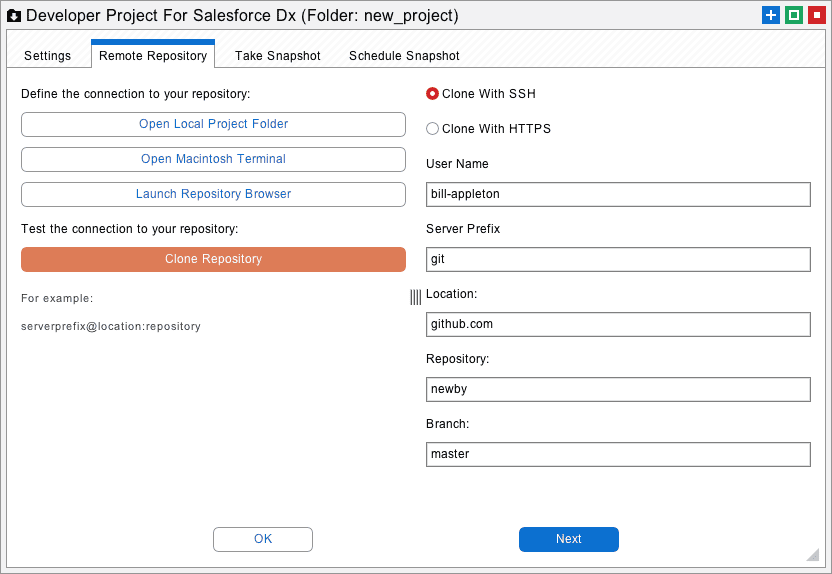
Your local Salesforce DX or Metadata API project can be optionally connected to a content repository like GitHub, GitLab, BitBucket, or Azure DevOps. In this case, the editing tools for the local project are no longer displayed, because the source of the metadata files is now the remote repository. The project folder is still used to store a local copy of the files. Developers can switch the interface back and forth to work on the local project or the content repository as needed. When the project is connected to a content repository the files in the developer project will be replaced when a snapshot is taken.
The connection to a content repository can either be SSH (Secure Shell) or HTTPS (Hypertext Transfer Protocol Secure). Select either option and fill out the other fields below. To test the connection, click the Clone Repository button. If the command works, the repository will be cloned to the local folder. If there is an error, Snapshot will display the command line and the error that was returned. You can try this on a local terminal and figure out why the command failed.
Just because the local folder has been populated with metadata assets does not mean that there is a snapshot available for the project. The take snapshot tab provides the interface to create snapshots for the project. This option will convert Salesforce DX projects and harvest metadata files so that a snapshot can be created with the assets. This enables all the other capabilities in Snapshot to work with your developer project just like a Salesforce org.
After a snapshot you can connect your project to any other project or Salesforce org and compare assets, deploy metadata, manage the time series, and set up continuous integration. If you right click the project, you will see that all of the metadata reports that are available. Note that none of the data usability or security reports are listed, because a developer project does not have actual data like a real Salesforce org.
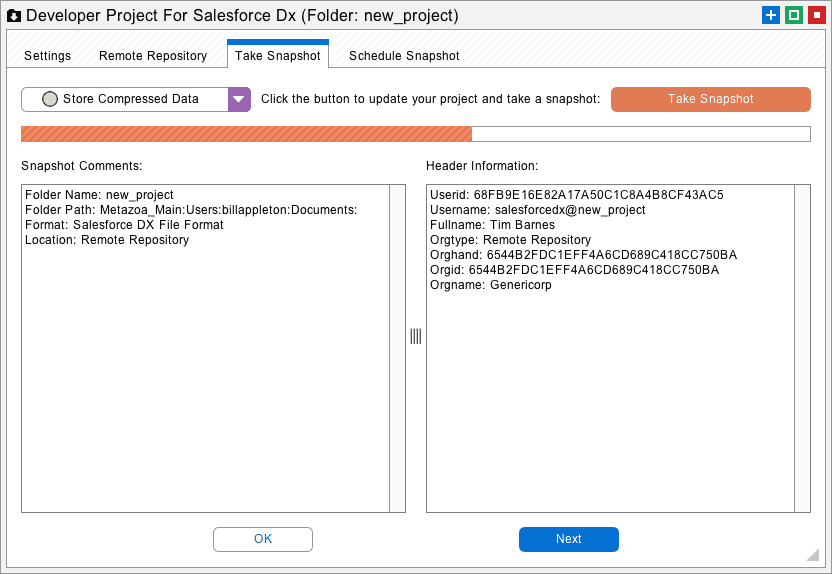
If your developer project is connected to a content repository then be aware that taking a snapshot will clone and/or pull the remote metadata asset files down to the local project folder. The files in your developer project will be updated by the remote repository every time a snapshot is taken.
The deploy metadata interface works with developer projects as either the source or the destination of the selected arrow. If a developer project is the source, then all the metadata assets in the current snapshot of the developer project are available for deployment. If the source project is a content repository, then a snapshot will update the project, and the latest metadata assets from the repository can be deployed. This works for developer projects in either Force.com IDE, Metadata API, or Salesforce DX format.
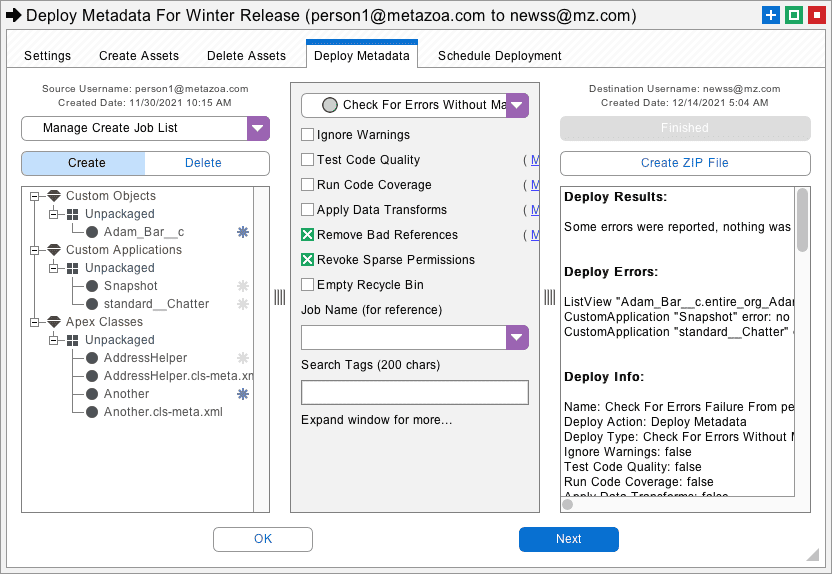
If a developer project is the destination of the deployment, then the files in the local project folder will be created, updated, and deleted just like an actual Salesforce org. If the project is connected to a content repository, then the remote files will be changed. This works for developer projects in either Salesforce DX or Metadata API format. The options to roll back a deployment or perform a quick deployment are disabled when the destination is a developer project.
The deploy metadata interface can be extremely helpful in straightening out developer projects or Salesforce orgs that have fallen out of synchronization. You can use the powerful metadata deployment interface to take snapshot of either the source or destination, compare the differences, and make whatever changes are needed.
If you right-click any deployment arrow you will see the option to set up continuous integration. This brings up the continuous integration interface pictured below. There are two main styles of continuous integration to choose from. The first is triggered when the source Salesforce org or developer project changes. In this case selected metadata types are moved from the source to the destination. The second watches for changes in deployment history. When a new deployment makes changes to the source Salesforce org or developer project, then the same deployment is replayed on the destination. The two different styles of continuous integration are discussed below.
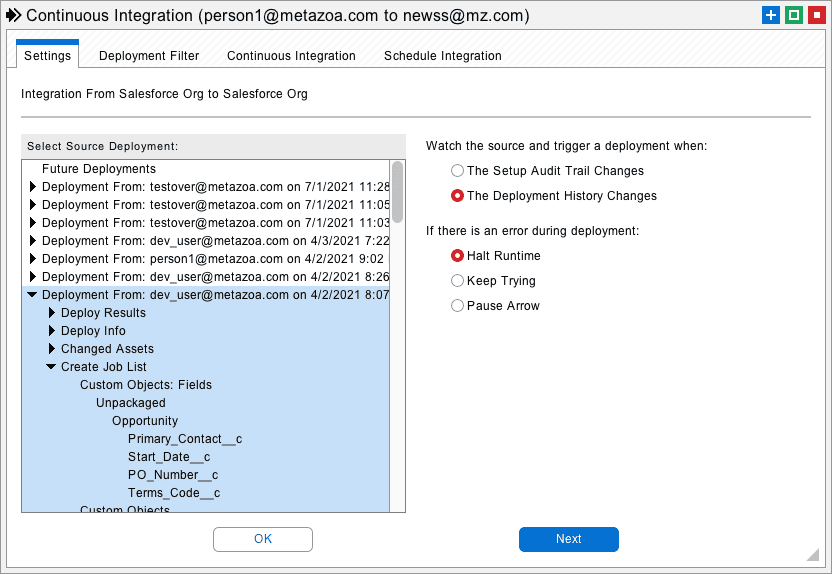
The continuous integration interface can be activated manually or scheduled to monitor changes to the source Salesforce org or developer project. Here are the different ways that a Salesforce org or developer project can trigger the continuous integration engine:
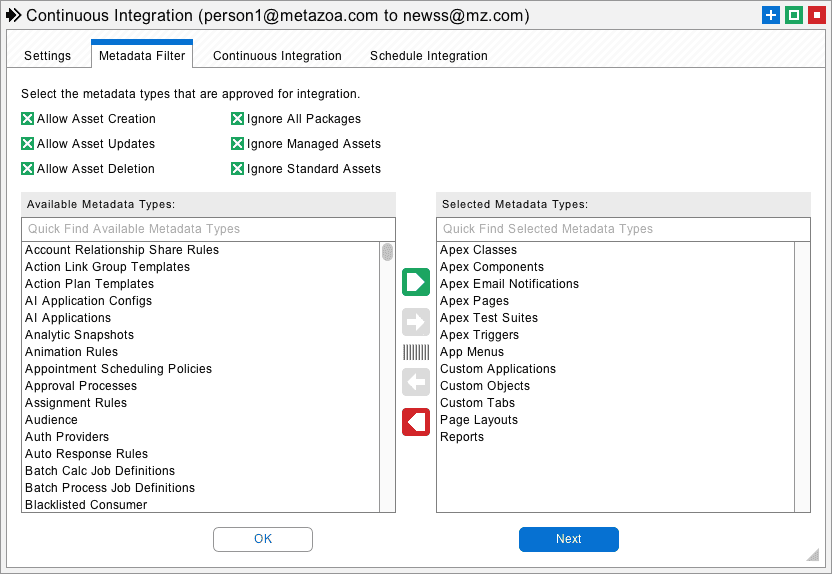
When the source Salesforce org or developer project has changed, then the continuous integration engine looks for differences between the source and destination. Only certain metadata types are scanned for differences. These types are selected on the metadata filter tab, pictured below. When differences are detected, the destination org is updated to be the same as the source. Other metadata types not in the filter are ignored.
The deployment might include creating, updating, and/or deleting assets on the destination. The destination might be a Salesforce org, local project, or content repository. This works with both Salesforce DX and Metadata API formats. This method of continuous integration is very useful for developer projects focused on specific asset types, like Apex Classes, or Custom Objects. Any changes on the source will automatically be moved to the destination.
Every metadata deployment in Snapshot creates a deployment history report. These reports are stored in two custom objects in the license org where the Snapshot package is installed. You can create reports with these objects in the Salesforce HTML interface, and this information is also used by Snapshot for governance and reporting. Here are the two custom objects involved:
The metazoa3__snapshot_push__c parent object stores information about each deployment, including the job lists, snapshot limits, deployment options, and whether the deployment actually made changes to the Salesforce org or developer project.
The metazoa3__snapshot_asset__c child object stores information about each item in the create or delete job list, including error messages and whether the asset was created, deleted, or updated.
The second type of continuous integration monitors the deployment history on the source Salesforce org or developer project, and then replays the same deployment on the destination. This style of continuous integration is especially useful when complex metadata types are involved. When an administrator designs and executes a successful deployment, they have specified certain references to remove, or data transforms, along with a carefully selected set of assets to create and delete. All this intelligence is captured in the deployment history object and used again for the destination deployment. This method of continuous integration is very useful for complex metadata deployments between related orgs. For example, you could automatically replay any deployment to production to keep a sandbox synchronized.
The deployment history reports cover live Salesforce orgs as well as any developer project or content repository that your company is working with. This allows new deployments to any developer project or content repository to trigger continuous integration. This information is available in the Asset History report as well, improving compliance and documenting the complete chain of custody for metadata assets between Salesforce orgs, developer projects, and content repositories.
Once you have selected the style of continuous integration you want, you can manually test the integration and select other settings from the continuous integration tab. This tab is like the Deploy Metadata interface. If the destination is a Salesforce org, you have access to all the deployment options, like removing references, and running Apex tests. If the destination is a developer project, there are fewer deployment options, and the format of the deployment results report is also a little different.
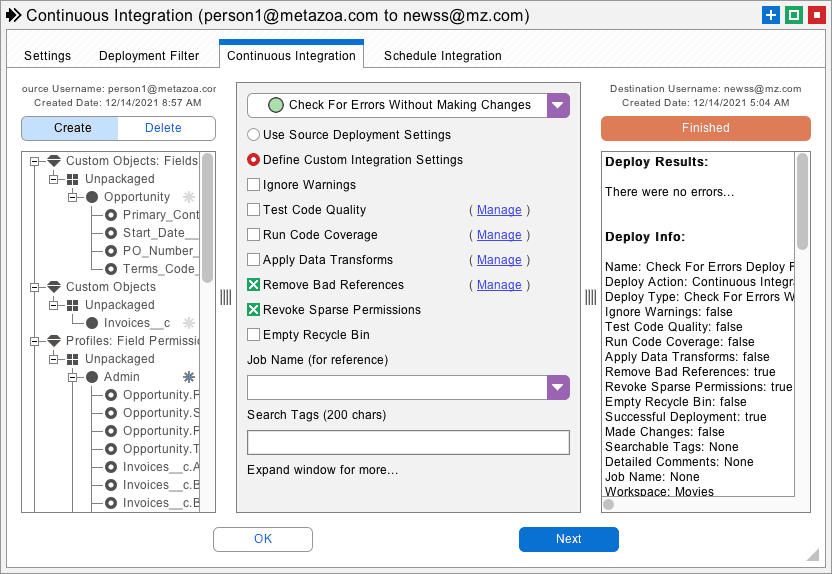
When you click on the Validate Integration button you will see what will happen on the next integration, and the create and delete job lists that will be generated. This is very useful for testing out the design of the continuous integration, seeing the expected results, and then moving on to schedule a recurring event on the next tab. Don’t forget to set the center menu to transactional or partial deployments. If this menu is left set to validating deployments, then your scheduled integration will continuously check for errors and never actually do anything.
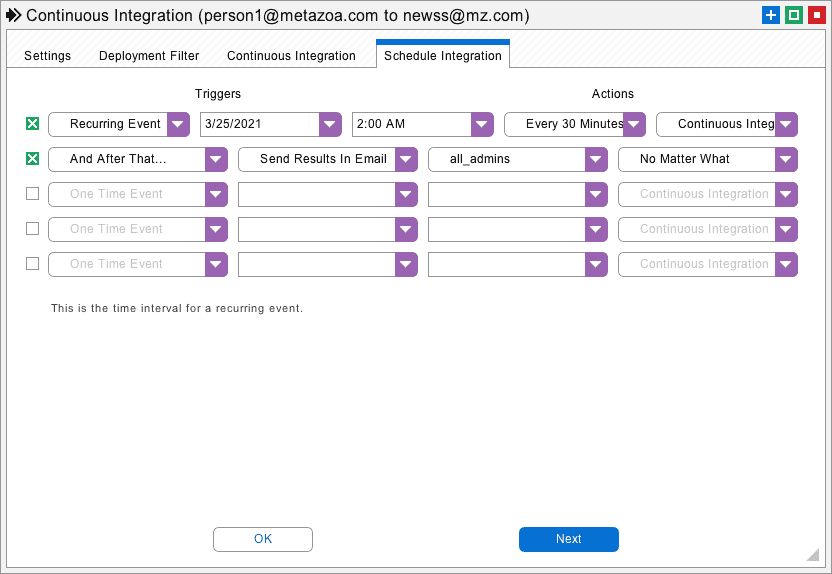
You can schedule a continuous integration in the normal manner as a recurring event. The results of the last integration can also be sent in an email or Salesforce Chatter depending on the outcome, including:
There are many uses cases for installing Snapshot on a server with a remote desktop. For example, a Salesforce administrator could automate continuous integration activities for a large team of developers. Compliance and security reports could be run as scheduled events and trigger alerts. Metadata deployments could be scheduled to occur during off hours. All these things can be done with a regular desktop computer, but a remote desktop offers convenience and flexibility for the busy administrator.
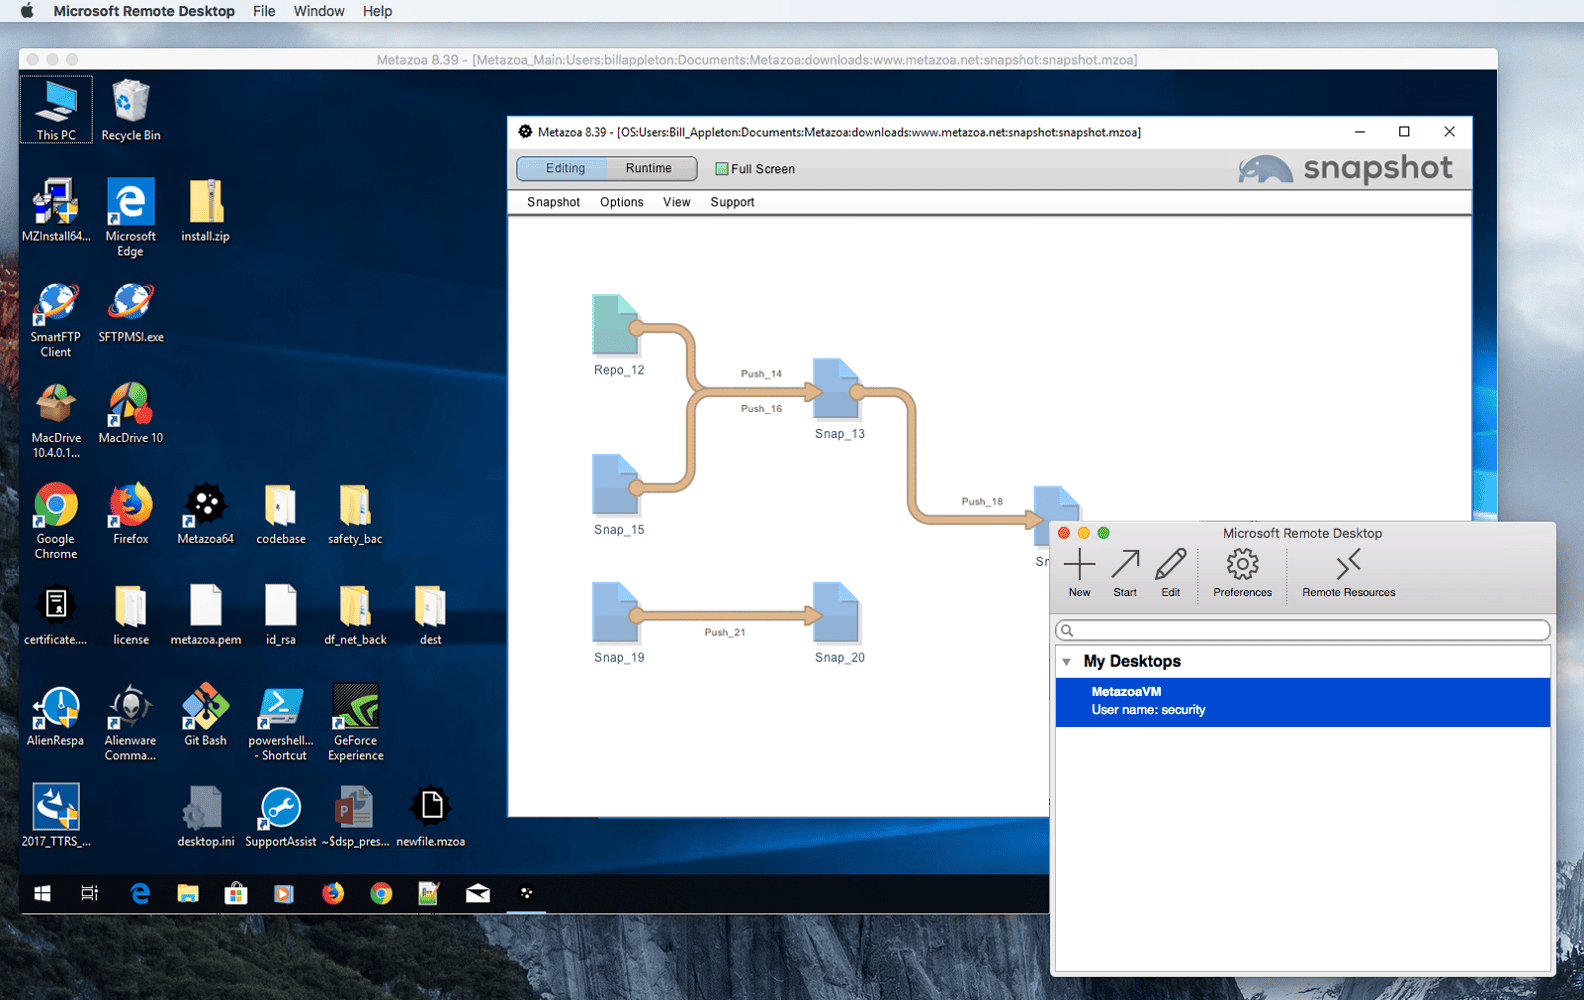
There is no limit to the number of Snapshot servers that you can create. In the picture below, we have set up Snapshot on Windows Server 2016 hosted by Microsoft Azure. We are accessing the server with the Microsoft Remote Desktop application from a Macintosh. The only option to configure is that we suggest turning off sound effects from the Snapshot Preferences dialog. Cloud servers don’t usually have a sound card. Also make sure that the server does not sleep when running Snapshot continuously. You will want to install the 64-Bit version of Snapshot. You can adjust the amount of RAM and Network bandwidth as needed. More is better.
Snapshot on the desktop communicates between your personal computer and your Salesforce account. This architecture maximizes org security, data privacy, and application performance. Snapshot server follows the same security model, except now the communication is between your server and your Salesforce account.
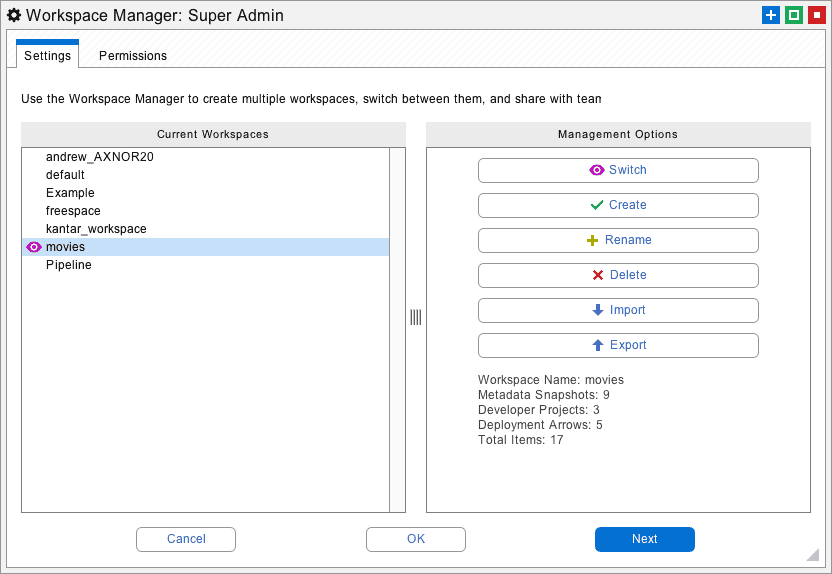
The Workspace Manager (available under the Snapshot Menu) can be used to switch between multiple Snapshot desktops. This is useful for designing different desktops for developers, administrators, and server installations. The desktops can be shared, and there is an option to lock them as well. This capability allows maximum flexibility to orchestrate development activities across projects and Salesforce orgs with continuous integration and metadata deployments.
This whitepaper has discussed the best practices for continuous integration using Snapshot on the Salesforce platform. The Snapshot product from Metazoa provides a best-of-breed solution for continuous integration with a highly flexible toolset. Click the download button to get the pdf version of this whitepaper.
 Congratulations!