Snapshot can migrate related data between orgs, seed Sandboxes with test data, and backup data for archive and compliance.
Snapshot provides powerful tools for migrating connected sets of data records between Salesforce orgs. This capability is useful for backing up data, refreshing Sandboxes, merging orgs, and populating orgs with test data for application development. The Bulk API is used for all transactions to ensure that very large datasets can be moved efficiently. We have moved millions of records while testing the data migration tools in Snapshot.

When records are migrated between orgs, all of the internal relationships are preserved. External references in the dataset are also connected to matching objects on the destination. This whitepaper presents detailed information on how to build and migrate datasets. We also document the CSV format that Snapshot uses for importing datasets from other systems or creating them with a spreadsheet editor.
When you select the Deployment Arrow between any two connected Snapshots, the Options Menu will display various commands. You can also right-click the Deployment Arrow to see the options in a popup menu. The third submenu will have options to Build, Migrate, and Manage Datasets. If you do not see these options, then perhaps the Deployment Arrow is connected to a Developer Project. They do not have any actual data and cannot be used as a source to build a dataset or as a destination for migration.
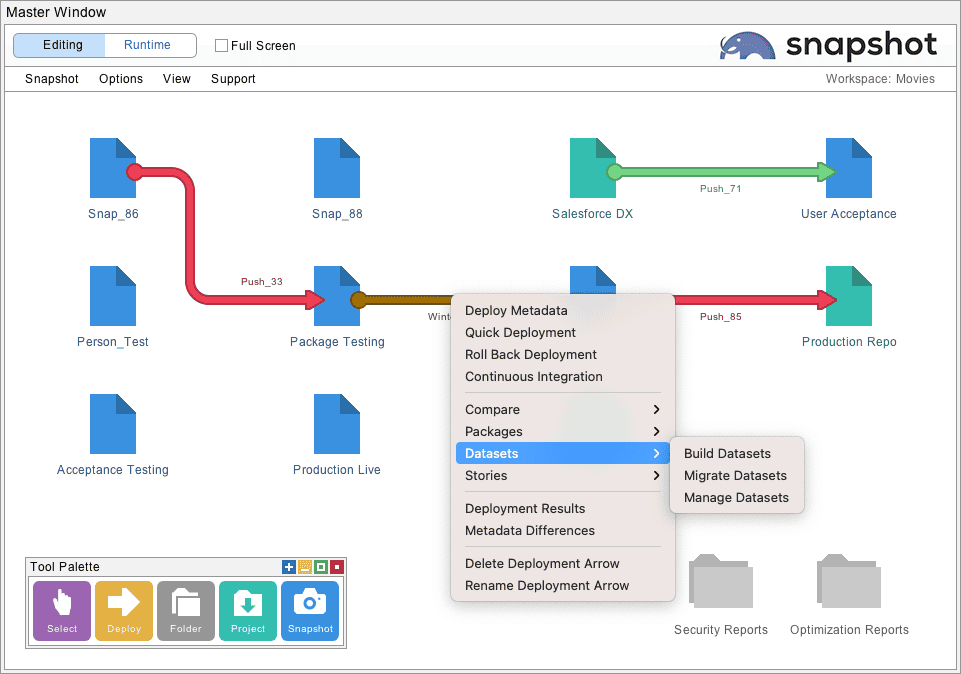
The option to Build Datasets will use the source Salesforce org to download multiple records in the form of XML files to your local machine. The option to Migrate Datasets will insert and update records from the selected dataset into the destination Salesforce org. The option to Manage Datasets can be used to create a dataset from CSV files, remap field names, remap field values, create external IDs, rename the dataset, duplicate the dataset, import CSV files, and export CSV files.
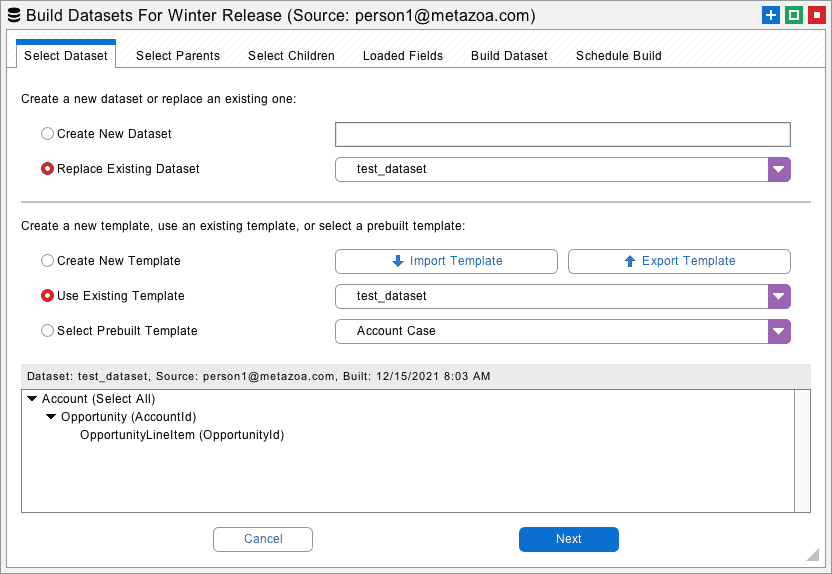
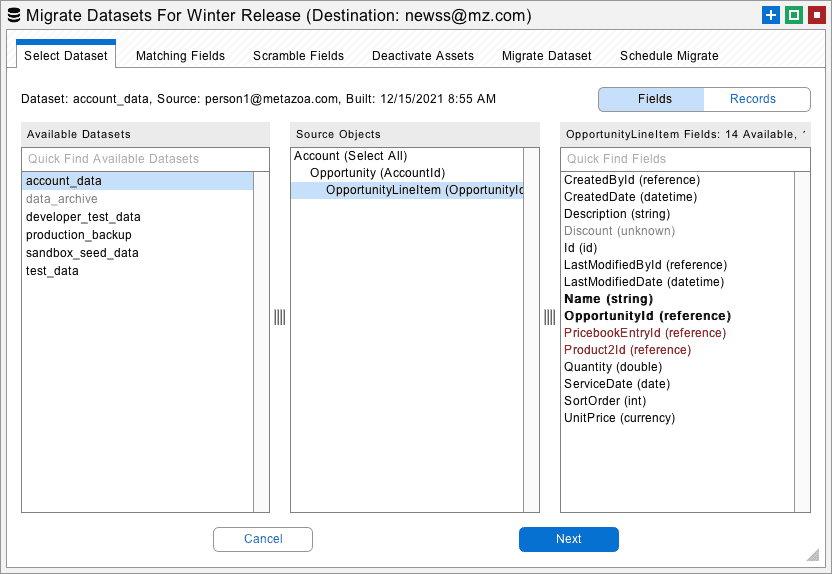
The first tab of the Build Dataset dialog allows you to select the dataset and template that you would like to work with. If you are moving records associated with a managed package, then check out the Prebuilt Templates menu for help moving those records. For example, Salesforce CPQ, Health Cloud, and Government Cloud all have custom templates.
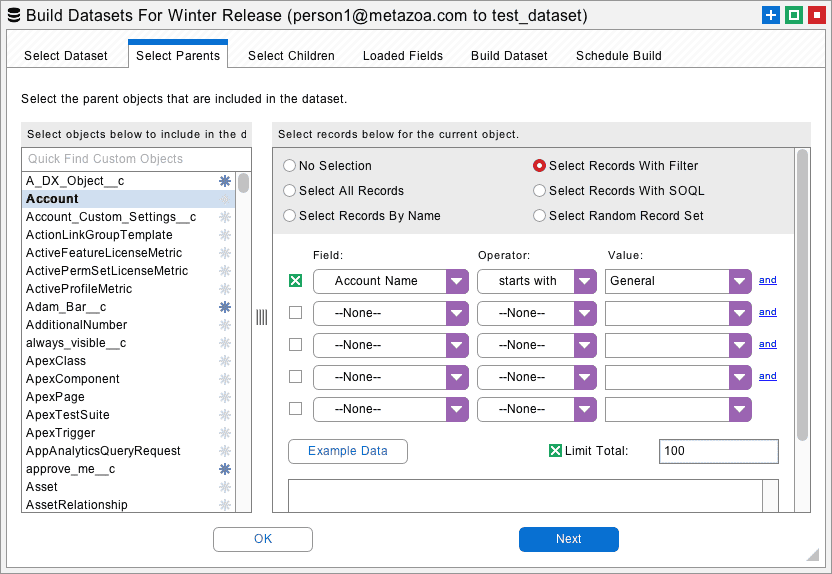
The next tab allows you to select the parent records that you want to include in the dataset. These records are available on the source Salesforce org. You can select all records, a subset of records by name, or a subset of records using a complex filter. There is also an option to write a SOQL query by hand. The total number of downloaded records can be limited. This is useful for grabbing a random subset of records for acceptance testing or application development.
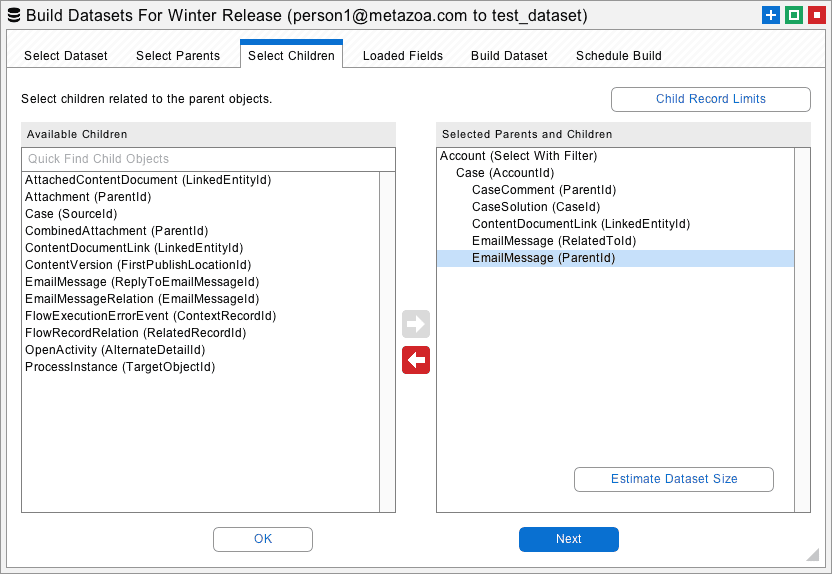
The next tab allows the selection of connected child objects for each parent object. When a dataset is created, the selected parent records are loaded first, followed by all the children connected to that parent. You can specify multiple child objects in a hierarchy. The relationship field used to associate each parent and child is shown in parenthesis. The internal relationships between parent and child are always preserved when the dataset is migrated.
The next tab allows you to select the parent records that you want to include in the dataset. These records are available on the source Salesforce org. You can select all records, a subset of records by name, or a subset of records using a complex filter. There is also an option to write a SOQL query by hand. The total number of downloaded records can be limited. This is useful for grabbing a random subset of records for acceptance testing or application development.
Notice the Child Record Limits button at upper right. This feature allows you to add a filter or limit the number of records for the selected child object. Also see the Estimate Dataset Size button at lower right. This option will calculate the estimated number of records and total size of the dataset before it is actually created.
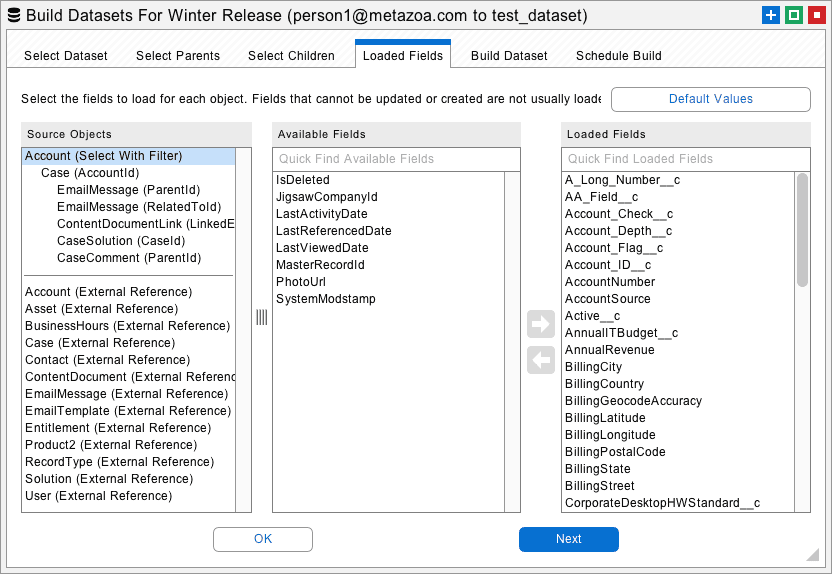
Snapshot also uses the loaded fields to identify matching records in the destination org during migration. If a source record matches a destination record, then the corresponding destination record is updated. If a source record does not match any destination record, then a new destination record is created.
Snapshot automatically selects the most common matching fields for you. However, you can also manually select matching fields. For example, if you want to match Accounts by Name and BillingCity, then be sure that both Name and BillingCity are loaded. You will be able to specify the exact list of matching fields that you want to use in the Migrate Datasets dialog.
Underneath the dividing line you will see “external references” to other objects in the destination org. For example, if you select Opportunity objects for migration then you will see an external reference to Campaigns, because the Opportunity object contains a CampaignId reference field. Snapshot will automatically connect external references to matching objects on the destination org when the dataset is migrated. You can manually specify additional fields needed for matching external references as well.
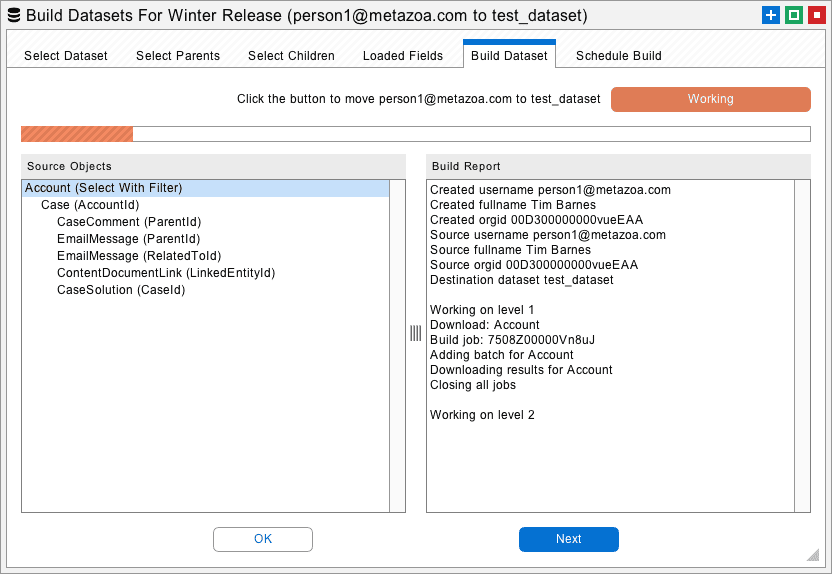
The next tab allows you to enter the name of a new dataset and then click the Build Datasets button at right to start the download process. If you select an existing dataset name from the menu then that dataset will be replaced. All of the download results will be listed in the window pane at lower right.
The XML files with your dataset information will be saved in the “datasets” folder next to the “workspaces” folder in the Snapshot file system. Datasets are globally available for migration to any destination org. In other words, any source org can be used to build a dataset, and any dataset can be migrated to the destination org.
The last tab allows you to Build Datasets at a specific time in the future or as a recurring event. When a scheduled dataset is created, it will automatically replace the current dataset by name. Unlike Snapshots, datasets are not maintained in a time series.
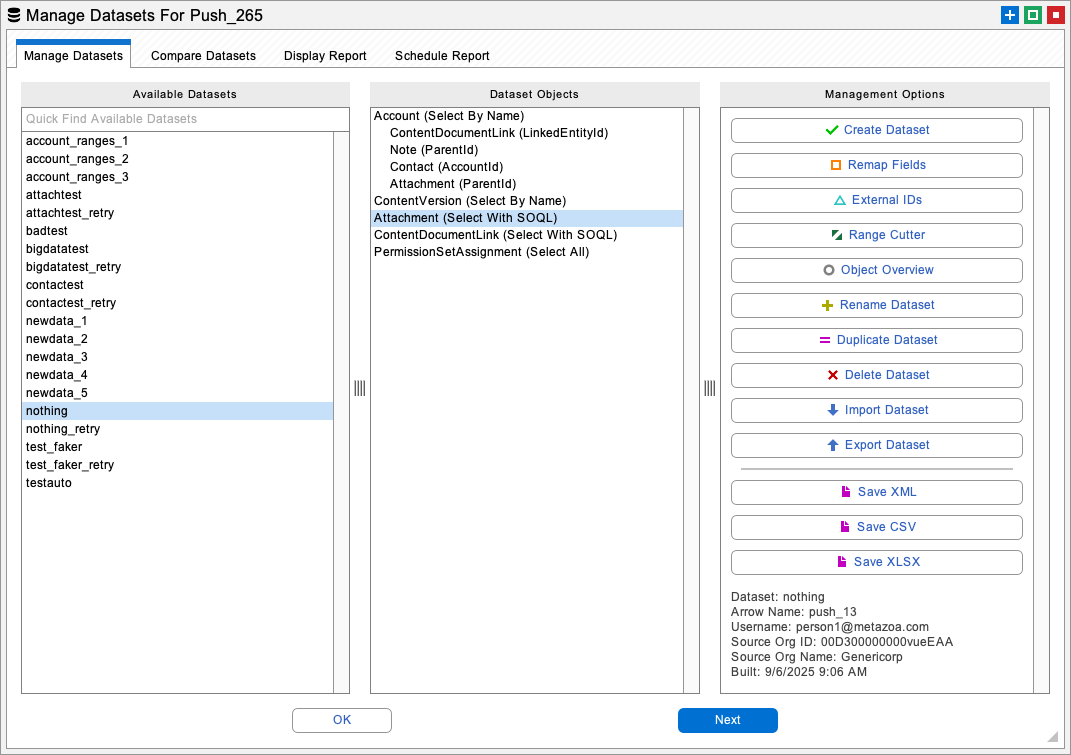
The Manage Datasets dialog has some very helpful utilities for creating and transforming your datasets. From this interface you can create a dataset from CSV files, remap field names, remap field values, create external IDs, rename the dataset, duplicate the dataset, import CSV files, and export CSV files. The next section discusses the CSV file format that is used by the create, import, and export options. If you don’t need that information right now, you might want to skip the next section. After that, we discuss all the options in the Manage Datasets interface.
The CSV file format encodes all the field values as well as the internal and external relationships in the dataset. This format expects the first row of CSV data to be field names, followed by additional rows for each record. The columns must include the field name “Id” to specify the source record ID, and the field name “objtype” to specify the object type. Here is an example below of a CSV file with two Account records:
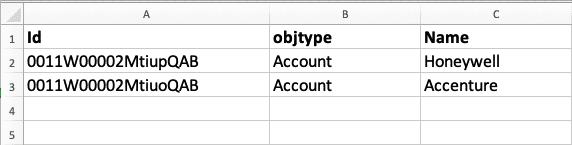
The rest of the columns can be used for other Account fields, in this example we only have the Account Name.
Now let’s look at another CSV file with Contact data. This file defines two Contacts and the Account that they are related to. The AccountId, AccountId.Name and AccountId.objtype fields contain information about the related Account. In this case, the Account Name can be selected as a matching field to find the Account. In our example, one Contact will connect to Accenture, and the other Contact will connect to Honeywell if these records exist in the destination org.

The required reference information is easy to include in the CSV file. For example, you could use the Salesforce SOQL Query below to capture all the information needed to create our example CSV data for Accounts and Contacts:
SELECT Id,Name FROM Account
SELECT Id,FirstName,LastName,AccountId,Account.Name FROM Contact
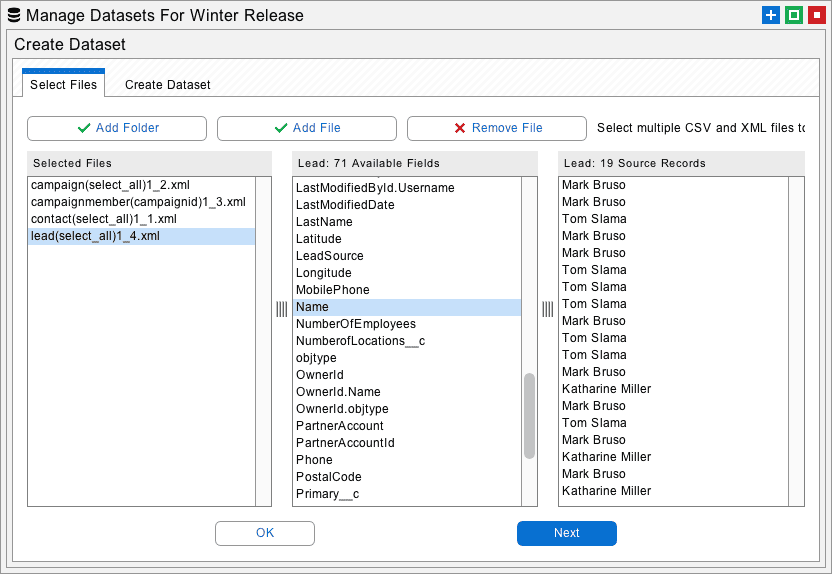
Click the Create button on the Manage Datasets dialog to open an interface that allows you to import files and folders. This information will be used to create a new dataset. The files should be in the CSV file format discussed above. You can also import XML files. Simply go to the dataset folder and select any group of XML files from an existing dataset. This is useful if you want to migrate an existing dataset in sections.
The imported files are added to the list at left. You can right-click the items here and adjust their order. This is useful for making sure that parent objects are processed before child objects. In the previous example, you would want to make sure that Accounts are listed before Contacts. The imported fields and source records are visible in the lists at right.
To create a new dataset, go to the next tab, give your new dataset a name, and click the Create Dataset button. This will add the new dataset to the list on the first tab of the Manage Datasets dialog.
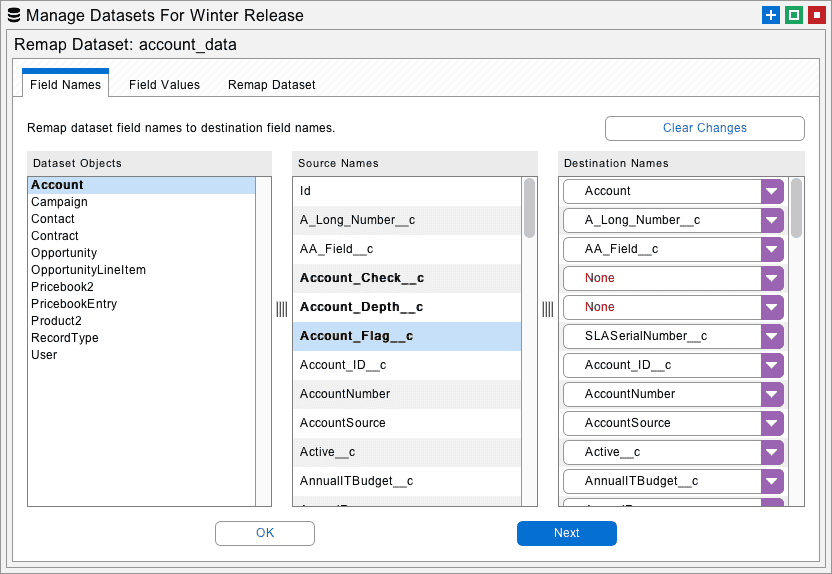
Click the Remap button on the Manage Datasets dialog to open an interface that will remap field names and values. Remapping field names is useful when you want to migrate the data between fields with different names. For example, you might need to merge two different custom objects.
To use this feature, select the object to be remapped at left. Select the field name to remap in the center and select the destination field at right. The fields at right will be defined by the available objects and fields in the destination org. You might have to select an arrow that has the desired destination org for this to work as expected.
Proceed to the Remap Dataset tab and click the Remap Dataset button. This will transform all the field names in the selected dataset. Now the field names in this dataset will match the destination org.
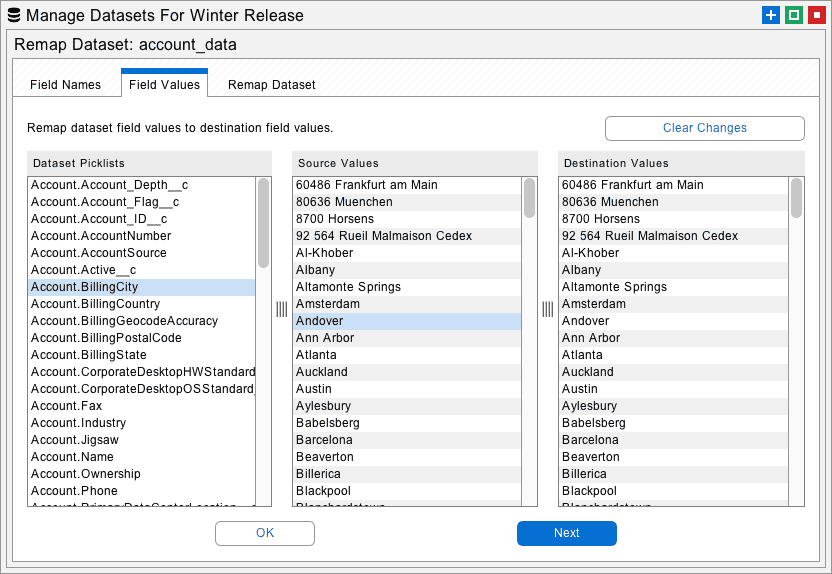
Click the Remap button on the Manage Datasets dialog to open an interface that will remap field names and values. Remapping field values is useful when there are username transformations, picklist differences, and email suffixes that need to be matched against the destination org.
To use this feature, select the object and field to be remapped at left. Select the source value in the center and type in a destination value at right. You can import and export all the destination values as text files. Right-click the destination for editing options.
Proceed to the Remap Dataset tab and click the Remap Dataset button. This will transform all the field values in the selected dataset. Now this dataset can be migrated to the destination and the new field values will match.
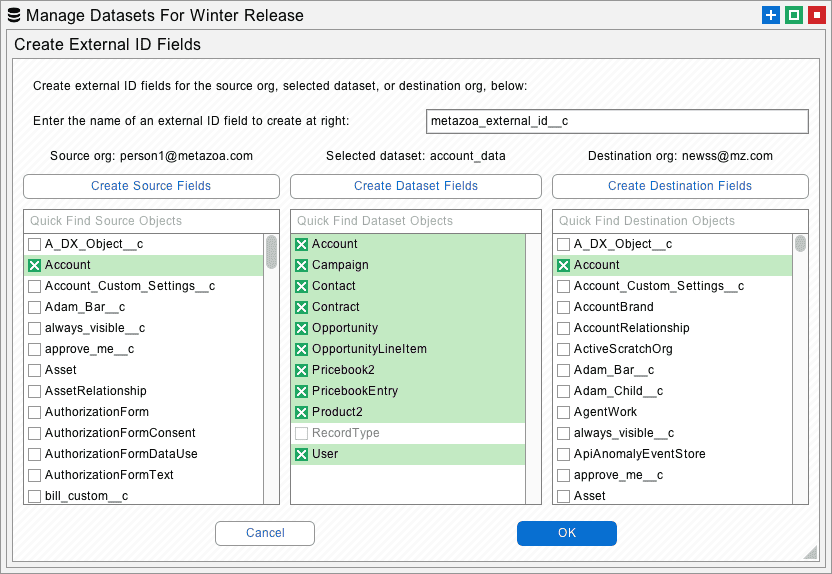
Click the External button on the Manage Datasets dialog to open an interface that will create external IDs on the source org, the dataset itself, or the destination org. When you create an external ID on the source org, Snapshot creates a custom formula field that sets the field value equal to the object ID. When you create an external ID on the destination org, then Snapshot creates a custom text field that receives the source ID value. You can give the new custom field any name that you like. Field Level Security is automatically set for the System Administrator Profile and the field is hidden from everyone else.
Sometimes administrators don’t want to create a bunch of external IDs in the source org. That might be disruptive if the org is in active use. In this case, Snapshot offers the capability to create an external ID on the dataset itself, as if the external ID was actually from the source org. This works exactly the same way when the destination records are tagged or matched with the source ID. The beauty of this is that you can fully exploit the power of migrating data with external IDs without actually having any external ID fields in the source org.
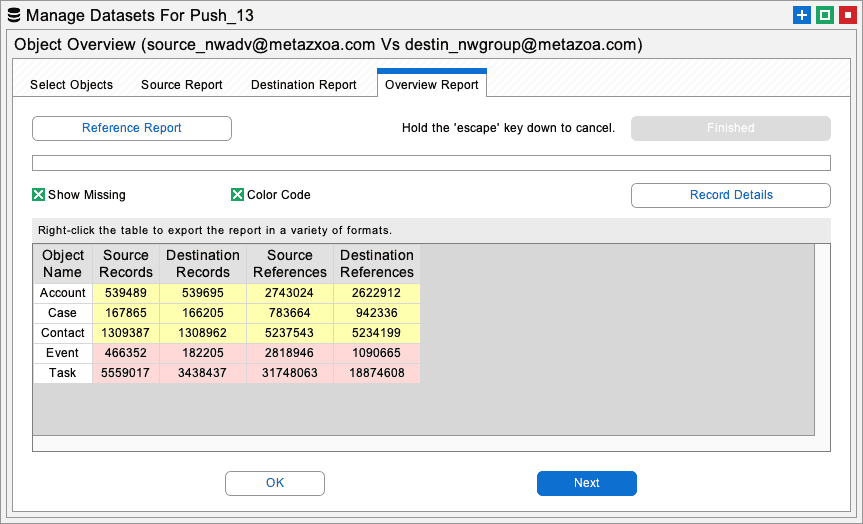
This report provides an overview of the differences between records in the source and destination orgs. Use this report to plan data migrations and determine when the migration has been successfully concluded. Here are the capabilities in this report:
Record Reports: Calculate object record count and permission information for selected objects in the source and destination orgs.
Object Report: Compare source and destination record and reference counts in a single report that is color-coded to highlight differences.
Reference Report: Compare the details in source and destination reference counts by individual field names in a color-coded report.
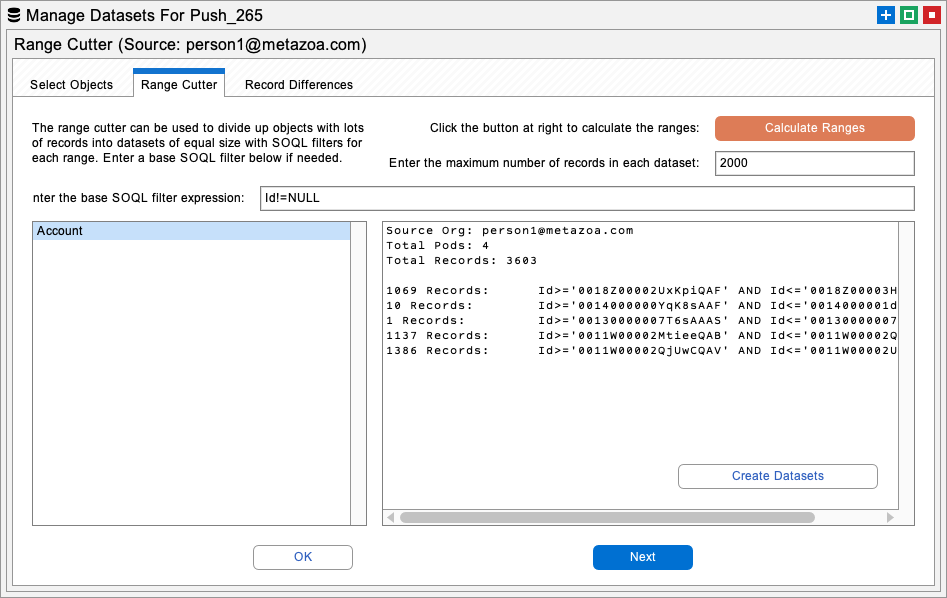
The Range Cutter interface can divide objects with lots of records into multiple datasets and generate SOQL expressions for each range. You can enter the maximum number of records for each dataset, calculate the ID ranges, and automatically create the datasets. On the last tab is an additional interface to find unique records on the source org and generate SOQL expressions to move these records to the destination. This capability can be used to create “catch up” datasets that contain any new records.
Range Cutter: Divide records into separate datasets and generate SOQL expressions for each ID range. This is useful for dividing objects with lots of records into multiple datasets.
Record Differences: Generate SOQL expressions for record differences between the source and destination org. This is useful for identifying records that have not been migrated.
Delete Filter: Delete destination records with a SOQL filter. This is useful for cleanup of unwanted destination records.
Create Multiple: Build datasets automatically based on an imported CSV file. This is useful for settings up massive data migration scenarios.
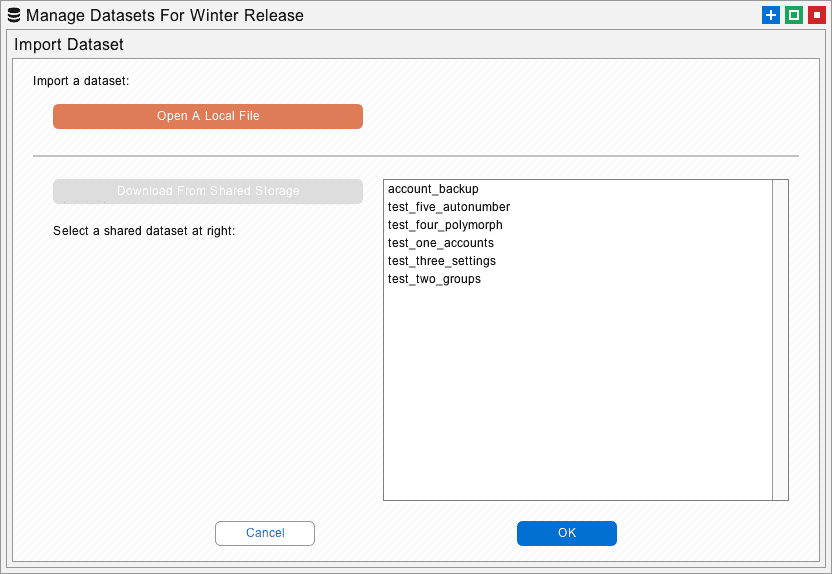
Click the Import button on the Manage Datasets dialog to open an interface that will import a dataset as a local file or from shared storage. Click the Export button to open an interface that will export a dataset as a local file or to shared storage. The local files will be saves as a zipped dataset folder. The shared storage uses Salesforce Content folders and documents that are saved in the Snapshot License Org. This is an easy way to archive datasets or share them with your administrative team.
After a dataset has been created, you are ready to migrate these records to a destination Salesforce org. Right-click a Deployment Arrow that is connected to the correct destination org and select the Migrate Datasets option to get started. The Migrate Datasets dialog allows you to select any of the global datasets from the list at left and see the objects and fields that are available in the list at right. The next four tabs provide options for matching fields, scrambling fields, deactivating assets, and finally migrating the selected dataset.
Here is a power user tip. You can right-click any of the objects in the middle list and export the data as an XML or CSV file. These files will be in the correct format for the Import Datasets dialog. For example, you could export a CSV file, edit the file as a spreadsheet, and then import your changes.
Snapshot uses the loaded fields to identify matching records in the destination org during migration. If a source record matches a destination record, then the corresponding destination record is updated. If a source record does not match any destination record, then a new destination record is created.
Snapshot automatically selects common matching fields for you. However, you can also manually select matching fields. For example, if you want to match Accounts by Name and BillingCity, then be sure that both Name and BillingCity are loaded. The selected fields create a logical AND filter for matching destination records.
One powerful way to match destination objects is with External Ids. Other common matching fields include object names, email addresses, and usernames. These fields will automatically be available to select for matching. Some Salesforce sandboxes have the same Ids as production orgs. In that case you can simply use the Id field for matching destination objects.
Another way to match destination objects is with Virtual IDs. Use the Virtual Id to match hard to find objects that don’t have a name. When these objects are created, Snapshot will remember the source ID and destination ID and always match them during future migrations.
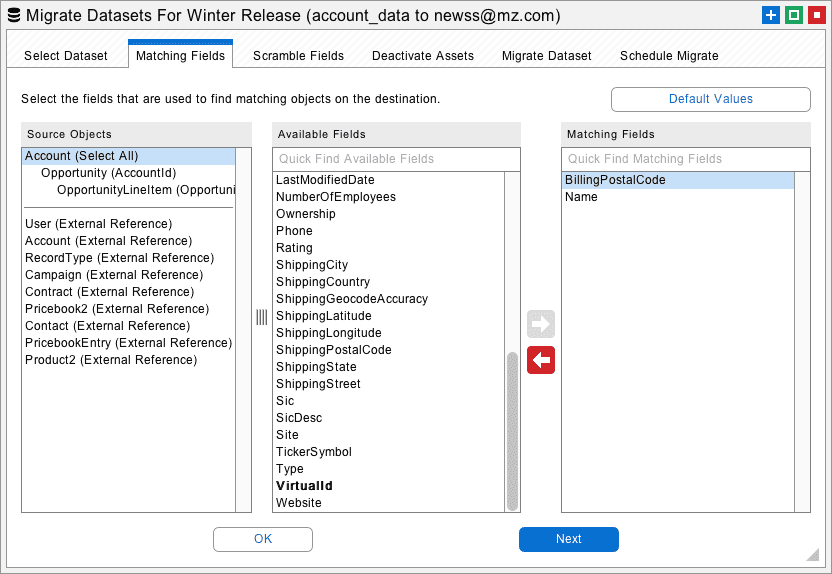
Underneath the dividing line you will see “external references” to other objects in the destination org. Snapshot will automatically connect external references to matching objects on the destination org when the dataset is migrated. You can manually specify additional fields needed for matching external references as well.
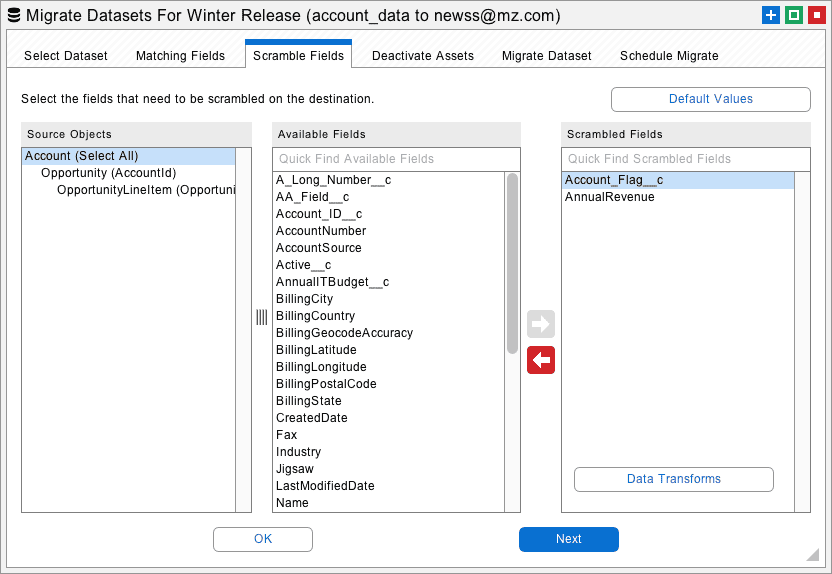
Datasets are often used to move records into a Salesforce Sandbox or Developer Edition for testing or application development. In these situations, you may want to scramble data records that contain sensitive information. These fields might contain financial information, such as credit cards or bank accounts, or personal information, such as email addresses or Social Security numbers. The Scramble Fields tab provides an easy way to obscure fields on the destination org. Move the fields that you want to scramble over to the list at right.
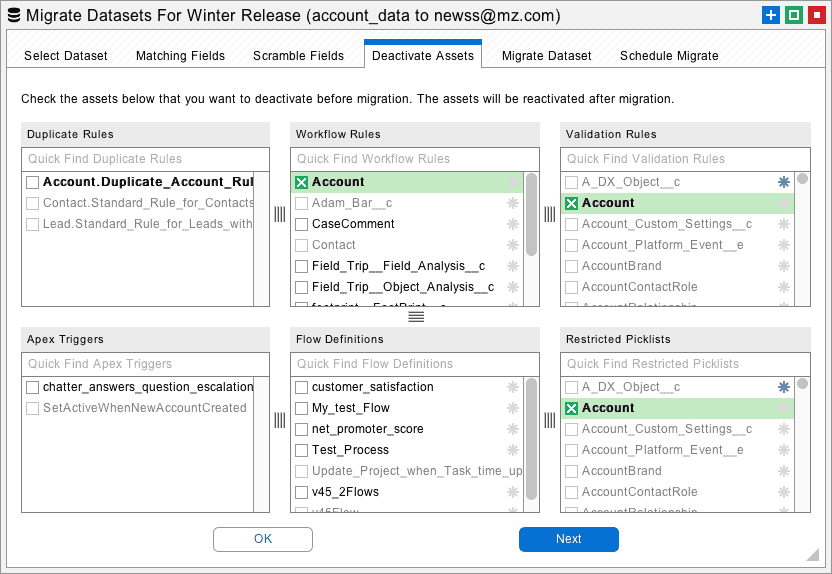
When a Salesforce record is inserted or updated, various Apex Triggers, Workflow Rules, and Validation Rules might be invoked. Apex Triggers perform custom actions before or after records are changed. Workflow Rules can also be invoked when records change, at which point they will perform automated actions. Validation Rules verify that the record data meets some kind of criteria before being inserted, updated, or deleted.
All of these automated behaviors can cause potentially undesirable effects during data migration. For example, thousands of emails might be sent out, or some records might not be updated. The Deactivate Assets tab provides an easy way to deactivate Apex Triggers, Workflow Rules, and Validation Rules in the destination org before data migration is attempted. After migration, the deactivated triggers and rules will be turned back on.
The next tab has the main interface for migrating datasets to the destination org. First, make sure that the migration options are set correctly, these are discussed in more detail below. Then click the Migrate Datasets button to get started. All of the details of the migration will be written to the report at lower right. The last tab allows you to Migrate Datasets at a specific time in the future or as a recurring event.
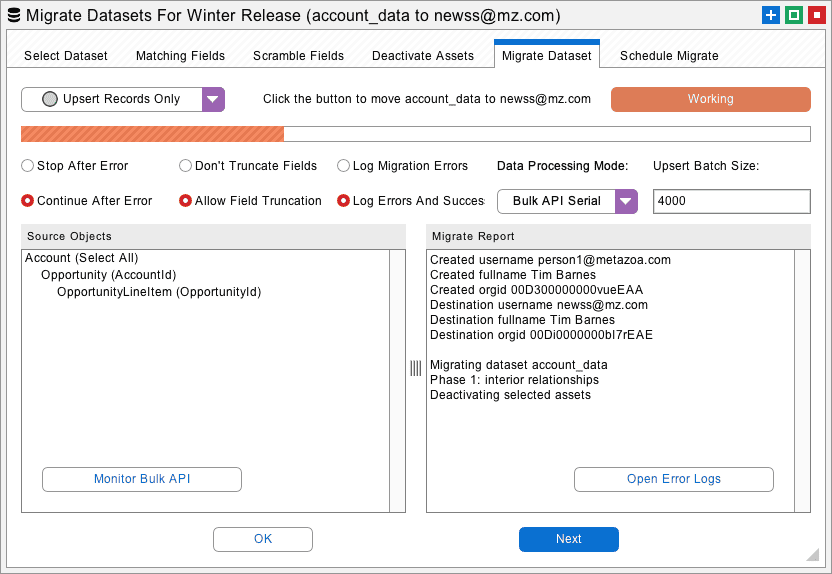
There are various options for Data Migration:
The menu in the upper left gives you the option to delete the current dataset before migration, delete and then upsert, and upsert only. Only records on the destination org that match records in the current dataset are deleted. For production orgs we check twice that the administrator wants to delete the data. Be careful with this option.
If an error occurs, then Snapshot will either stop processing additional files with the Bulk API or continue. All errors are written to the log files. Common errors include too many duplicate records, email addresses in the wrong format, field data in the wrong format, etc.
One common problem when moving data between different types of orgs is text strings that are too long for the destination field. Select this option to automatically truncate fields to the correct length or otherwise report an error.
All errors are written to the Log Files located in the “datasets” folder in the Snapshot file system. Optionally you can also log successful migrations. The log file contains the source and destination Ids as well as any error message.
Bulk API Serial is the default option. Bulk API Parallel is potentially faster, but may cause database lock errors. If the Bulk API is having performance or network issues switch to the Data API Serial. This data processing mode uses the standard SOAP Data API.
When you are building a dataset, you must select the parents and then the children in the object hierarchy. Try to only use parent objects and avoid using child objects if possible. Do not try to reconstruct the desired relationships in your data model when building the object hierarchy. All the relationships between the objects will be figured out by Monarch. Focus on simply getting the desired records into the dataset. Child objects should ONLY be used to limit selected records to the related parent. You do NOT need to reconstruct the relationships in your data model to connect everything properly.
If you build a complex object hierarchy that looks like your conceptual data model, then various problems can happen. First, child objects can end up in the dataset multiple times. There are situations where this might be needed, but when the dataset is migrated, each record will be migrated only once. Another consideration is that when a parent record fails to migrate because of some error that also prevents any child objects from being migrated, and their children, and so on.
When you are migrating a dataset, pay special attention to the matching fields that are selected. The matching fields must identify a unique record on the destination org. The first time a migration is run, matching destination record will be updated, and non-matching records will be created. If you run the migration again, you should only see updates, because every record on the destination will have a unique match. If you see more records being created that means you do not have reliable matching fields. This is why external IDs are highly recommended. They will create the record if needed and match forever after that. If for some reason you cannot use an External ID, then be absolutely certain that you are getting unique matching fields somehow.
Setup / User
Be sure you have “Salesforce CRM Content User” checked.
Setup / User Interface
Be sure you have ” Enable “Set Audit Fields upon Record Creation” checked.
Be sure you have “Update Records with Inactive Owners” checked.
Setup / System Permissions
Setup / Content Permissions
Make yourself a member of every Content Workspace with every possible user privilege. Do this for every Content Workspace on the source and destination orgs.
Our Monarch product has been rewritten quite a few times over the last 15 years. Along the way we have added some special cases to handle difficult migration issues. Ironically, Custom Objects work great, and we handle every use case. The problems start when migrating Standard Objects that were developed back in the olden days. They often have special server-side rules and constraints that require special handling.
Some lookup relationship fields are polymorphic. This means that a single relationship field can reference many different types of objects. For example, the Event object has a polymorphic relationship field called WhatID. This field can refer to dozens of different object types including Accounts, Contracts, and Opportunities.
Since many different types of objects can be referenced, there is no easy way to specify complex matching criteria for polymorphic relationship fields. By default, polymorphic relationship fields only reference the destination object by name. But some objects (like Accounts) can have duplicate names. Monarch handles this situation by first matching by name and then looking for External ID fields that match the source object ID.
Person Accounts are a special kind of Salesforce org where the Account and Contact objects are treated as a single entity. You can have both Person Account and Business Account records in the same org depending on the Record Type. You can move Business Accounts just like normal Account records, but Person Accounts will require some special handling and should be moved separately.
You will see some special fields on the Account object that have the “__pc” suffix. These fields are the custom fields from the associated Contact object. The first and last name fields are standard fields from the associated Contact object. To migrate Person Accounts, just move the desired Account records and be sure to include all of the “__pc” fields. When an Account record is created on the destination org, that will also create the associated Contact record. That is the only way to create a Person Account. All the new Contact fields will be populated with the “__pc” values.
You will need External IDs for both the Accounts and Contacts. Be sure to include both External IDs in the list of loaded Account fields. For example, you might have Metazoa_External_ID__c for the Account field and Metazoa_External_ID__pc for the Contact field. When the Account record is created, the associated Contact will also be created, and both records will have the correct External ID values. After that, you can update these objects and their associated Tasks, Events, Attachments, and Content Versions in the normal manner using the External ID.
Every Salesforce org comes with a Standard Pricebook2 object that cannot be created or deleted. Because of this, some special handling is required to migrate the Pricebook2, Product2, and PriceBookEntry objects.
First, install External ID fields in Pricebook2, Product2, and PriceBookEntry. Next, copy the Salesforce ID of the Standard Pricebook2 record in the source org. In the destination org, paste this ID into the External ID field of the Standard Pricebook2. Now the Standard Pricebook2 record looks like it has been properly migrated from the source to the destination org.
Next, build a dataset with the hierarchy below. Now when you migrate the dataset, the Standard Pricebook2 record will be found and assigned correctly. You will need to migrate twice, once to make sure that every Product2 has a Standard Pricebook2, and again to migrate any custom Pricebook2 records in the dataset.
Product2 (Select All)
Pricebook2 (Select All)
PricebookEntry (Pricebook2Id)
Every Opportunity has some Opportunity Line Items, and each line item is associated with a Pricebook Entry. The Pricebook Entry is automatically generated to match each Product and Pricebook pair. However, the Opportunity also has a direct reference to a Pricebook. That Pricebook must be the same one that is indirectly referenced by the Opportunity Line Item via the Pricebook Entry.
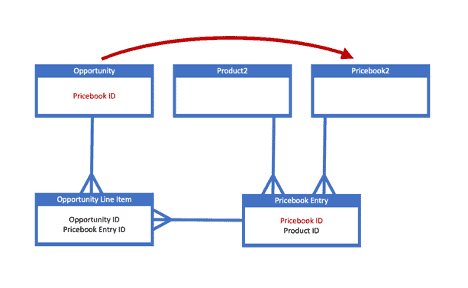
You can only create Opportunity Line Items that reference the same Pricebook that the Opportunity uses. This is tricky because the reference is indirect on both sides, so the correct Pricebook Entry must be selected. Monarch will do this automatically for you. Simply migrate these items in the hierarchy below:
Opportunity (Select All)
OpportunityLineItem (OpportunityId)
Here is another special case. Group Members are the junction object that connects a Group to another User or Group. They are not updateable, so Monarch will delete them and then create them as needed during migration. Migrate the parent Group object as metadata. Then the Group Members can be migrated.
There are two types of Custom Settings: List and Hierarchical. List custom settings must have a unique name, and the Setup Owner Id field must be equal to the Organization Id. Hierarchical settings must have unique Setup Owner Id that is equal to the Organization ID, a User ID, or a Profile ID. All of these constraints make Custom Settings hard to migrate. Monarch will handle the migration automagically, although there are some possible errors. For example, you cannot migrate a list Custom Setting to a hierarchical one, and vice versa.
Activities are made up of two objects - Tasks and Events. They can be migrated as children of the appropriate objects or as parent objects themselves. Snapshot is smart enough to figure out the relationships for standard objects like Account, Contacts, Opportunity etc. If you have a Custom Objects with activities, you are better off migrating the activities as children. Archived Tasks and Events are available when building a dataset. Filter by the IsArchived field if you do not want to include archived activities.
EmailMessages can be migrated as parent objects themselves. Be sure to set the IsClientManaged checkbox. That will prevent the Email Message from becoming locked after migration. Monarch will automatically remove the ActivityId and ValidatedFromAddress fields.
Salesforce Classic stores files as Attachments. They can be migrated as children of related objects. For example, you might move Accounts as the parent with Attachments as the child. Salesforce Lightning stores files as Content Documents. These are discussed next.
Before getting started, be sure you have all the administrative permissions to manage Content. First, move all ContentVersion records to the destination. This migration will create the associated ContentDocument records automatically. Next, move ContentWorkspace records if desired. Move the ContentDocumentLink records as children of related objects. For example, you might move Accounts as the parent with ContentDocumentLink as the child. This will connect each parent to the appropriate ContentDocument on the destination. You can also move the ContentDocumentLink records separately as junction objects. When moving ContentVersion records, we recommend that you filter on records where the IsMajorVersion flag is true. This prevents the minor versions from being created. Here are additional details:
https://www.metazoa.com/publications/content_migration_notes_v5.pdf
Here are the steps to move Knowledge__kav articles. First, be sure to deploy the Data Category Group metadata type. Next, migrate the ‘online’ articles. The parent object will be Knowledge__kav, and the child object will be Knowledge__DataCategorySelection. Move the source objects where PublishStatus=’online’ and then run an Apex script to publish all the draft articles. This will move the destination articles from ‘draft’ to ‘online’ status. Next, migrate the ‘draft’ articles, if any. This will create the ‘draft’ articles on the destination, do not change them to online. Here are additional details and Apex Classes to help:
https://www.metazoa.com/publications/knowledge_migration_v2.zip
When you turn on "Relate Contact to Multiple Accounts" under Account Settings, the AccountContactRelation object becomes available. This feature can reduce data duplication with Contacts that span Account boundaries. You must migrate Accounts and Contacts first, and then you can migrate AccountContactRelations as a child of Accounts or Contacts. Be aware that whenever a Contact that is related to an Account is created this automatically creates an AccountContactRelation.
The migration of Campaigns, CampaignMembers, and CampaignMemberStatus records must be handled in a special way. This migration is complicated by some unusual server-side integrity checks for the CampaignMemberStatus records. Follow the best practices below for a successful migration of these objects.
https://www.metazoa.com/publications/campaign_member_status_v1.pdf
The Experience Builder web sites are challenging to migrate. For one thing, all the associated portal users must be in place and active. The objects below show the basic order of operations. The FeedItem object is the parent of FeedAttachment and FeedComment. These objects must be migrated together. The FeedItem object does not have a name or an external ID, so use the VirtualID as a matching field. The system creates many FeedItem objects automatically, so you will want to limit your migration to user generated FeedItems where the type is ContentPost, LinkPost, QuestionPost, or TextPost. The FeedComment field RelatedRecordId references ContentVersion objects. The FeedAttachment RecordId field references both ContentVersion, and ContentDocument objects. The TopicAssignment object should be migrated where the EntityType is not FeedItem. The TopicAssignment records that are related to FeedItems are automatically created when the associated FeedItem is created.
1) Metadata Deployment
Networks
Custom Sites
Experience Bundles
Site Dot Coms
2) Data Migration
collaboration groups
collaboration group members
Topic
WorkBadgeDefinition
WorkThanks
WorkBadge
FeedItem
FeedAttachment (FeedEntityId)
FeedComment (FeedItemId)
The Bulk API won’t move everything. A related problem is that some objects have Base64 fields that can be gigantic. For these special object Monarch switches to the SOAP Data API and handles the migration in a serial mode. This ensures that every type of object can be migrated. Here are the objects with Base64 fields:
And here are the objects the Bulk API does not support:
This whitepaper has discussed the best practices for data migration using Snapshot on the Salesforce platform. The Snapshot product from Metazoa provides a best-of-breed solution for continuous integration with a highly flexible toolset. Click the download button to get the pdf version of this whitepaper. There is also a case study available for relational data migration.
 Congratulations!