Metazoa provides a powerful tool chain capable of conducting complex org splits, clones, and reboots on the Salesforce platform. This whitepaper outlines the best practices for setting up and using our Snapshot product for this purpose. We cover customer facing project management issues, manual steps needed to prepare the source and destination orgs, and the metadata deployment and data migration capabilities in Snapshot that simplify this task.
There are some differences in how org splits, clones, and reboots are conducted. In each case, all the metadata in the source org must be moved to the destination org. After that, different users and data records are moved between the source and destination. For the purposes of this whitepaper, here is how we define each scenario:
Org Split • All source metadata is moved to the destination org, then a subset of users and data from the source org are moved to the destination. This situation can happen when a company decides to split off a division.
Org Clone • All source metadata is moved to the destination org, but no users or data are moved to the destination. This situation can happen when a company decides to clone an existing org for new users.
Org Reboot • All source metadata is moved to the destination org, then all users and data are moved to the destination. This situation can happen when a company decides to reboot an org because of technical debt.
You might be wondering why all the source metadata must be duplicated in the destination org. If we are splitting the source org, why aren’t we splitting the metadata? The answer is that architecting the user experience of the destination org at the metadata level is quite difficult. Imagine a few thousand Apex Classes. Which ones should be moved? Because of this difficulty, the best practice is to duplicate all metadata and then make other required changes on the destination org using the Setup Menu and extensive user acceptance testing. Technical debt should be removed from the source org before the operation or in the destination org after the operation. Snapshot also provides extensive tools for technical debt removal.
Customer Checklist
We have a standard checklist of items that we ask each customer to consider. The answers help scope the work and set expectations. Our actual checklist has lots of additional information surrounding each one of these questions, but at a high level you will need to know:
- Is this a Split, Clone, or Reboot?
- Do You Have Portals or Communities?
- Do You Have Managed Package Versions?
- Do You Have Private Reports?
- Do You Need to Divide Apex Class Files?
- Do You Have Lots of Object Data?
- Do You Have Lots of Metadata Assets?
- Do You Have Enterprise Territory Management?
- Do You Need Certain Objects Migrated?
- Do You Have a Plan for User Migration?
- Can We Put External IDs in the Source Org?
- Do You Need to Migrate Pardot?
- Do You Need to Migrate Chatter?
- Do You Need Converted Leads Moved?
- Do You Need Audit Fields Migrated?
- Do You Have Backend Integrations?
- Do You Have Salesforce Knowledge?
Problematic Assets
We also include a list of problematic assets that probably cannot be migrated or deployed. The customer needs to know these technical limitations and prepare accordingly. The problematic issues are:
- Lightning Experience is Expected for New Orgs
- Last Modified Dates are Difficult to Migrate
- Some Metadata Assets Have Been Deprecated
- History Tracking Objects Cannot Be Migrated
- Converted Leads are Difficult to Migrate
- Inactive Content Versions are Difficult to Migrate
Manual Setup Tasks
The first step in any org split, clone, or reboot is making all the settings in the destination org look just like the source. The metadata Settings objects can be migrated between orgs, but there are many settings that are not represented by metadata assets, and these must be configured by hand in the Setup Menu. We like to open two browser windows, one for the source and one for the destination, and make these changes in parallel. Here are some of the manual setup tasks:
- Enable/Disable appropriate Release Updates
- Set Company Information.
- Set Business Hours and Fiscal Year
- Enable My Domain and Enhanced Domains.
- Enable multi-currency
- Set Org wide email address
- Set Process Automation settings
- Rename Tabs and Objects
- Enable Translations
- Enable PersonAccount
- Enable add-ons: CPQ, LiveAgent, Knowledge, FSL, etc.
- Create dummy profiles with Salesforce min_profile
- Enable History Tracking for standard objects
Enable Individual Settings
- User Interface
- Orders
- Quotes
- Activity Settings
- Contact Roles on Contracts
- Contact Roles on Opportunities
- Contract Settings
- Forecast Settings
- Opportunity Settings
- Product Settings
- Sales Processes
- Social Accounts and Contacts Settings
- Update Reminder
- Salesforce Files settings
- Org wide email address
- Default Workflow user in Process Automation settings
User Synchronization
When working on the source and destination orgs, you will need a source and destination user account. The usernames you choose should include the words “source” and “destination” to clearly mark each org and help prevent accidents. We like to use our company name “metazoa” to label things that we have created versus the original assets. The source and destination usernames might look something like this:
[email protected]
[email protected]
The source and destination users should have access to every possible permission. Custom administrative Profiles can be created for the new users. Otherwise, there may be data and metadata characteristics that can’t be read from the source org or written to the destination. The source Profile can potentially be given read-only access to Custom Objects as a safety measure. The source and destination users should also have every relevant license. Every single license on the source org should be given to the source user, and all these licenses should also exist on the destination org and be given to the destination user. Otherwise, there may be data and metadata characteristics that can’t be read from the source or written to the destination.
There are some situations where the source and destination orgs may have irreconcilable differences. If the source org is old, it will likely have grandfathered Salesforce features that have since been deprecated and cannot be enabled on the destination org. Some old metadata asset types like sControls can also no longer be created in any new destination org. If there is a managed package in the source org that has been deleted, or if the installed version of the package cannot be located, then this can be another source of irreconcilable differences. If a package like this has lots of global Apex classes that are widely referenced in the source org, then duplicating the metadata will be difficult and may require software development.
If the source and destination orgs are configured differently then there may be hundreds or even thousands of differences that show up in an org difference comparison. These differences will be very annoying during metadata deployment and data migration. An example might help. During a recent org split engagement, the customer had Shield Platform Encryption installed on the source org but was unable to outfit the destination org with the same feature. Because of this, there were quite a few standard objects on the source that could not be migrated to the destination. There were also hundreds of special “encryption scheme” elements in source fields that could not be migrated. Later in this whitepaper, we present the best practices for dealing with irreconcilable differences between the source and destination orgs.
User Migration
Salesforce users combine aspects of both metadata and data. First, usernames and user emails can be stored in org metadata in many different places. But users themselves are stored as data along with all license information. References to user records are stored by many different data records. All of this impacts your ability to deploy metadata at first and migrate data after that. Here are some of the best practices for managing users in an org split, clone, or reboot project.
Destination Users
Your destination org will need user licenses set up before other metadata is migrated. You should determine the list of users to be moved and ask your Salesforce account representative for temporary licenses in the destination org. You need to migrate these users to the destination with a different username pattern. For example, we append “metazoa” to the usernames, here are example usernames for the source, destination, and sandbox org:
[email protected]
[email protected]
[email protected]
User Mapping
You may have specific users in a business role that need to be remapped to specific users on the destination. Be sure to assemble a user mapping list that can be used for metadata deployments and data migrations. Metadata deployments can map usernames with the Apply Data Transforms feature. Data migrations can map usernames on the Scramble tab and in the Manage Datasets interface.
External IDs
We recommend using external IDs to map all users for data migration right from the beginning of the project. This will simplify user references allowing the username and email address to change as needed between the source, destination, and sandbox orgs.
Dummy Profiles
One helpful trick is cloning the Salesforce Minimum Profile and creating all the other Profiles by name in the destination org. These dummy profiles populate the destination namespace and allow Profile references to be found during metadata deployment and data migration. Since Profiles contain references to many other assets, the dummy Profiles should be replaced towards the end of the metadata deployment phase of the project.
Snapshot Workspace Setup
Create a new workspace and drag three snapshots and two developer projects onto the desktop. Connect these items with deployment arrows and give them the names pictured below. By clicking on the right connecting arrow, you can move metadata from the source snapshot, the developer project, or the shell assets project as needed. Each one of these desktop items is discussed in turn.
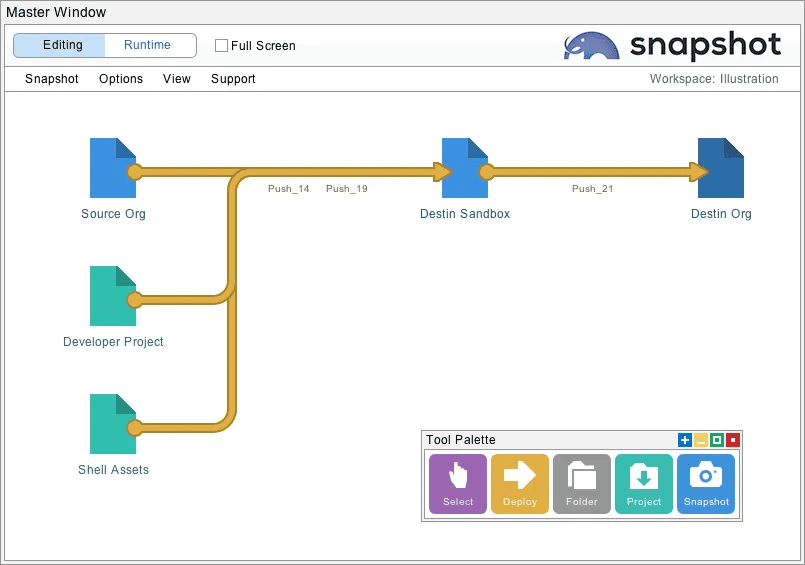
Source Org
Configure the source org item with the username discussed earlier and take a full snapshot of the org. We recommend putting the source snapshot on the far left-hand side of the window. This will prevent the source from accidentally being used as a destination for data or metadata.
Destination Org
Configure the destination org item with the username mentioned earlier. Be sure you have completed the manual setup tasks and user synchronization work discussed above. Log into the destination org and create a partial sandbox, you will need this sandbox for the next step.
Destination Sandbox
Configure the destination sandbox item and take a full snapshot of the org. All metadata changes will initially be moved into this sandbox. When the sandbox is ready and tested the metadata will be moved on to the destination org. This simplifies the migration process because (1) there is no code coverage requirement for the sandbox and (2) you can use partial deployments that change everything possible and ignore errors. You will only need a few snapshots of the source org, but the destination snapshots will be updated many times as the work proceeds. The sandbox will be very similar to the destination org, including my domain names and mapped usernames. This will simplify the final migration.
Developer Project
You may also need the developer project pictured above. This item is used to save all the metadata files from the source org in a local desktop folder. You can initialize these files from the developer project interface or with a deployment from the source org. These files can be pushed to the destination sandbox just like the source snapshot. The big difference, however, is that files in a developer project are easy to edit. You can edit the project files to make virtual changes to the source org. For example, if the source org has Shield Encryption turned on and the destination does not, then you can edit the project files and remove this line:
<encryptionScheme>None</encryptionScheme>
Most text editors have search and replace for multiple files, that is an easy way to make required changes. After making changes to the local files in the developer project be sure to take a new snapshot. The first screen of the metadata deployment interface has a menu selection that will update the snapshot. Now when you push asset files from the developer project, the files will have the desired differences from the real source org. This is convenient because the changes are hidden from all difference comparisons between the developer project and destination org.
Shell Assets
Imagine that you are moving a few million metadata assets from the source org to the destination. You can’t move them one at a time because of dependencies. Asset A depends on asset B, which depends on asset C, and so on. The deployment boundary for asset A might ultimately include hundreds or even thousands of other assets. And you can’t move them all together either, because 15% to 20% of the assets have some other error associated with them. These secondary deployment errors might happen because of problems with licenses, settings, users, record types, or other differences between the two orgs.
This complex web of dependencies makes it almost impossible to move metadata from the source to the destination org. Trying to move any large group of assets results in thousands of errors that are difficult to deal with all at once. All it takes is one error to stop the deployment. This problem becomes exponentially more serious as the total number of assets increases. What can be done to break this logjam?
Metazoa provides a breakthrough solution to the metadata dependency problem. We have created Shell Assets that will allow you to move Custom Objects, Apex Classes, Lightning Bundles, and other highly entangled metadata types very easily. Shell Assets have all the correct internal names. For example, a Custom Object will have the correct Custom Field names, and the Apex Classes will have the correct Class and Method names. But Shell Assets don’t include any internal references to other assets. They are self-contained.
Because they are independent, Shell Assets can be deployed anywhere without error. Once they are deployed, the dependency problem goes away, because the destination namespace has been populated with all the correct fullnames. After that, most other assets can be migrated easily, and the original assets with real dependencies can be migrated as well. Here are the instructions on how to set up the Shell Assets.
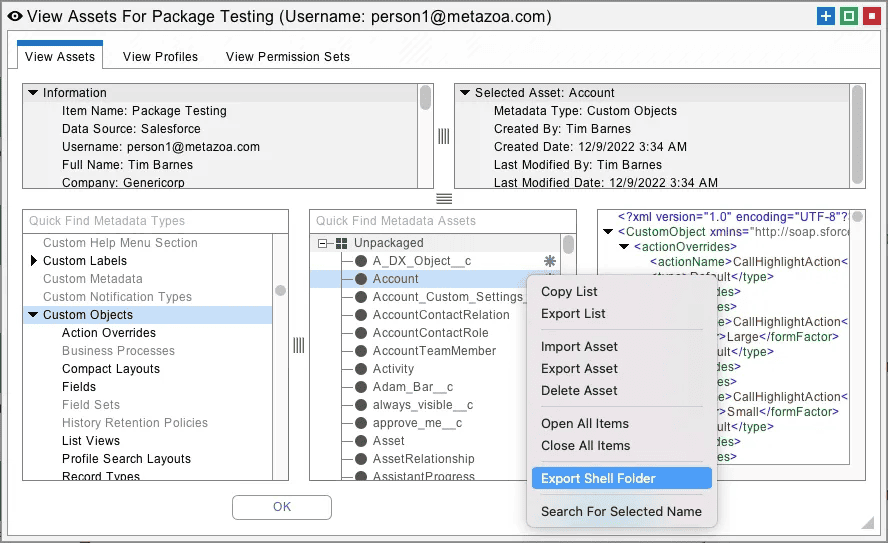
First, open the View Assets interface on the source org. Navigate to Custom Objects, Apex Classes, or any other metadata type that supports Shell Assets. Right-click the asset list in the middle and select the Export Shell Folder option. Next, select the folder associated with a Developer Project where you want to save the Shell Assets. This will create numerous Shell Asset files in the destination folder. This developer project can then be used to deploy the Shell Assets into the destination org. You will want to deploy the Shell Assets early in the project. This will clear the way for all the other metadata assets to be deployed thereafter. The next section discusses using the Snapshot tools for rapid deployment.
Rapid Administrative Deployments
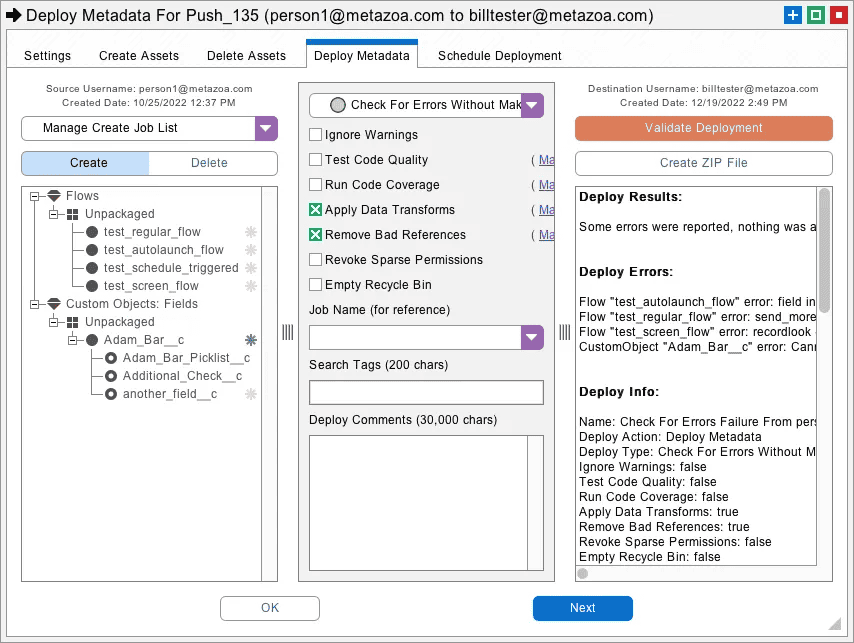
The Snapshot metadata deployment tools are designed to enable hundreds of metadata deployments between the source snapshot, developer project folder, or shell assets folder and the destination org. After the shell assets are deployed, you will want to move on to the source developer project, or if there are no edits to the source org, you can use the actual source snapshot instead. The idea is to hammer the destination org with multiple deployments until you have banged it into the required shape. Here are the specific features that Snapshot employs for administrative deployments:
Full Coverage
Most DevOps projects use a few dozen metadata types at most. DevOps tool chains are good at moving Apex Classes, Custom Objects, Apex Pages, Custom Metadata, and other asset types commonly used for application development. Our Snapshot product specializes in the correct deployment of all 220 metadata types. This kind of complete coverage is required for managing the Salesforce platform, duplicating an entire org and removing technical debt.
Org Based Deployments
Trying to conduct an org split or merge with DevOps tools is very painful. Merging XML in the Git repository to create a promotion branch requires additional time and effort for each deployment. During an org split there is no need to perform code merge or track individual changes. All this change tracking and XML merging requires extra steps that slow down the entire process.
Rapid Fire Deployment
Snapshot specializes in making hundreds of deployments an hour. Many deployments will fail and need to be quickly adjusted for another attempt. Snapshot provides a highly interactive and visual user experience that maximizes developer productivity enabling them to hammer the destination org into shape.
Remove Bad References
Snapshot can automatically remove references in Profiles, Permission Sets, Page Layouts, and Objects that are missing from the destination org. This option prevents failed deployments and moves as much of the metadata asset as possible to the destination org.
Integrated Impact Analysis
Snapshot has the most comprehensive and complete Impact Analysis engine available on the Salesforce platform. We support all 220 Metadata Types and recognize all 1240 possible relationships between metadata assets. This engine is integrated into our deployment tools. You can select any asset for deployment and see and select dependent assets.
Search For Asset Types
Snapshot can intelligently mine metadata deployment errors for assets missing from the current deployment. Simply select any asset name in an error message and right click to search for the asset type. Snapshot will automatically add these asset types to the create job list for quick redeployment.
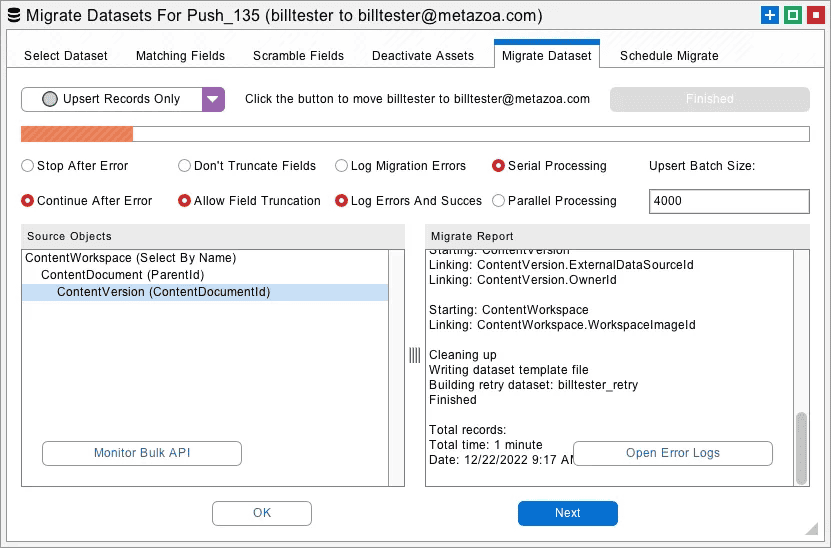
Comprehensive Data Migration
After the destination org has all the required metadata, Snapshot provides powerful tools to move subsets of data between orgs. As mentioned earlier, an org split, clone, or reboot may require some, none, or all the data to be migrated. In this case, you will want to migrate data from the source org to either the destination sandbox for testing or the destination org for final delivery. Here are the special purpose features in our data migration tools that make them especially relevant or org splits, clones, and mergers:
User Mapping
Use the Manage Datasets interface or the Scramble and Transform feature in Dataset Migration to map users from the source to the destination org. This might require adding or removing a suffix or mapping the entire username from the source to destination.
Legacy Objects
The Snapshot dataset migration technology has been specialized for handling the oldest Salesforce objects including Content Version, Opportunity Pricebooks, Group Members, and Custom Settings. These legacy objects are extremely important for successful project completion during an org split, clone, or reboot.
SOQL Segmentation
The Snapshot dataset migration technology has lots of features to segment parent objects and all attached children. This is very helpful during org splits where selected data and user records are being moved. You can select parents with interactive filters or SOQL strings.
External IDs
Snapshot is very good at managing External IDs. This is the best method for reliably finding the matching object on the destination org and then either creating the first version or updating the same record after repeated migrations. External IDs can be created in the dataset itself removing the need for adding fields to the source org. This capability is in the Manage Datasets interface.
Immutable Datasets
Lastly, Snapshot datasets are immutable and saved as XML files on the local computer. This is extremely helpful for migrating the dataset as many times as necessary to the source or destination org over time.
Conclusion
Org splits, clones, and reboots are one of the most challenging administrative activities on the Salesforce platform. This whitepaper has covered customer facing project management issues, manual steps needed to prepare the source and destination orgs, and the metadata deployment and data migration capabilities in Snapshot that simplify this task. The other option is to hire a large team of developers or consultants to do the work by hand. This approach is guaranteed to be slow, expensive, and error prone. If you need help with a mission critical org split, clone, or reboot, please reach out and let us know how to provide support. We offer consulting on a project basis, or you can have our Professional Services Team handle everything for you.
 Congratulations!