Automatically clone even the most complex production org in just a day or two.
Metazoa has released advanced tooling that enables any Salesforce Administrator or Consultant to automatically clone even the most complex production org in just a few days. This breakthrough in platform agility is powered by specially constructed metadata components called Shell Assets. The two-stage deployment process enables Administrators to rapidly bootstrap destination environments and then deploy the real metadata without triggering dependency errors.

In the first stage, specially constructed assets are deployed to the target org. In the second stage, those shells are overwritten with the full source metadata, enabling a clean and accurate replication. With shell asset technology, you can:
This bootstrapping process breaks through the log jam of deployment errors caused by metadata dependencies and dramatically reduces the time and effort needed for any org split, clone, or reboot project. This white paper covers the best practices for using shell assets.
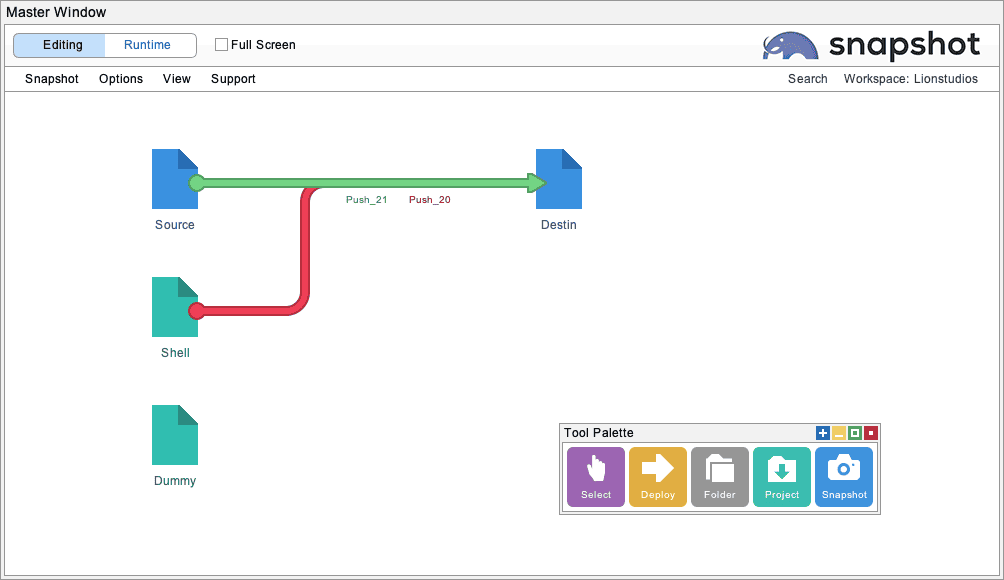
You will want to set up a workspace like the one pictured below. The blue items are snapshots of the Source and Destination orgs. Be sure to use descriptive usernames for the administrators of these two orgs to help prevent confusion and accidents. For example:
[email protected]
[email protected]
The green items are developer projects that hold metadata files stored on the local computer. These developer projects are for the Shell Assets, discussed in this section, and for Dummy Assets, which are discussed in the last section.
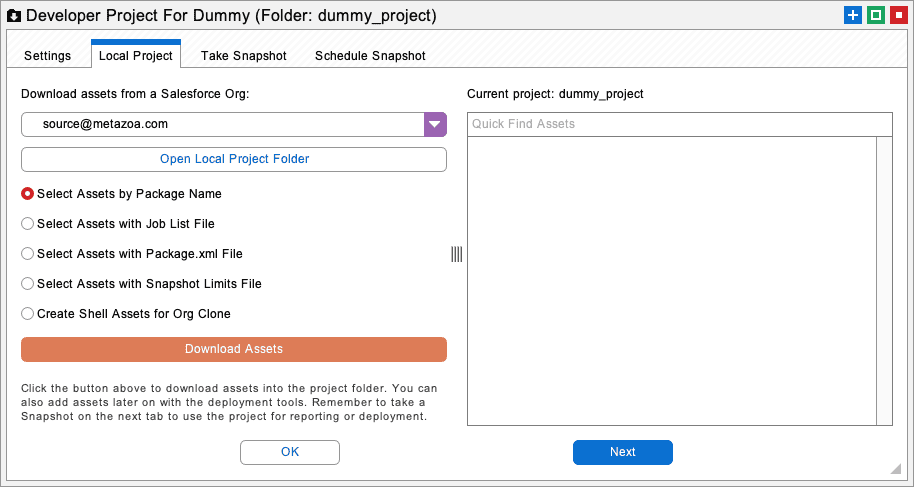
Open the developer project for the shell assets and select a local folder for the metadata. We recommend a folder with the name “shell” in the title. Next, go to the second tab of the developer project and create the shell assets. To do this, select the Source Org Username from the popup menu, and the Create Shell Assets for Org Clone radio button option, and then click the Download Assets button.
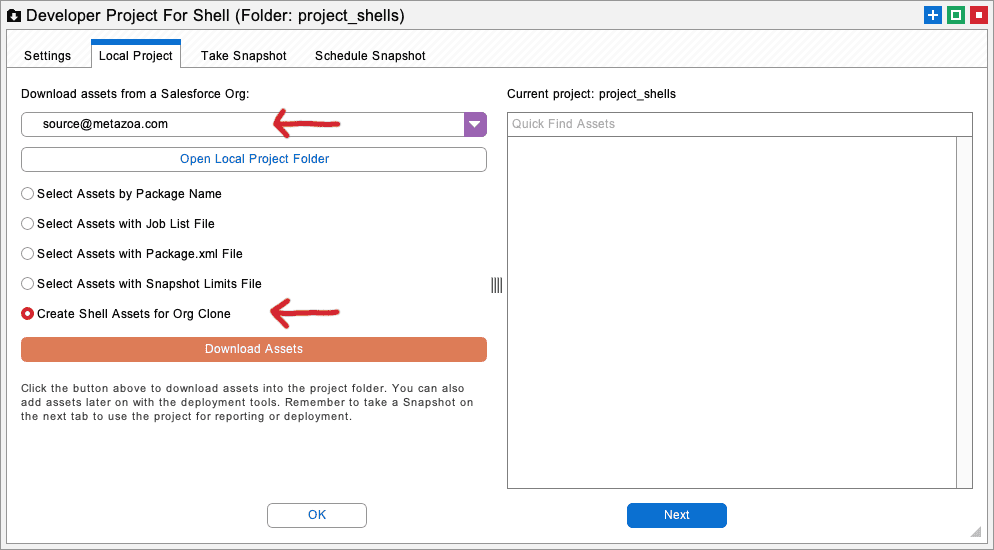
Once you have clicked the download button the developer project will be populated with shell assets derived from the source org. This may take a few minutes. These special assets have no dependencies and many other characteristics that make them easy to deploy in stage one of an org clone. They are also designed for easy replacement in stage two of the process. Be sure that you do NOT accidentally deploy the shell assets to another org or use them for some other purpose, they are highly modified versions of source org metadata.
Back on the main workspace, create or select the arrow from the shell assets project to the destination org. You will notice that everything in Snapshot moves from left to right, this is designed to reduce user error and prevent accidental changes to the source org. Right-click the arrow and select the Deploy Metadata option. This will bring up the deployment interface that connects the shell assets to the destination org.
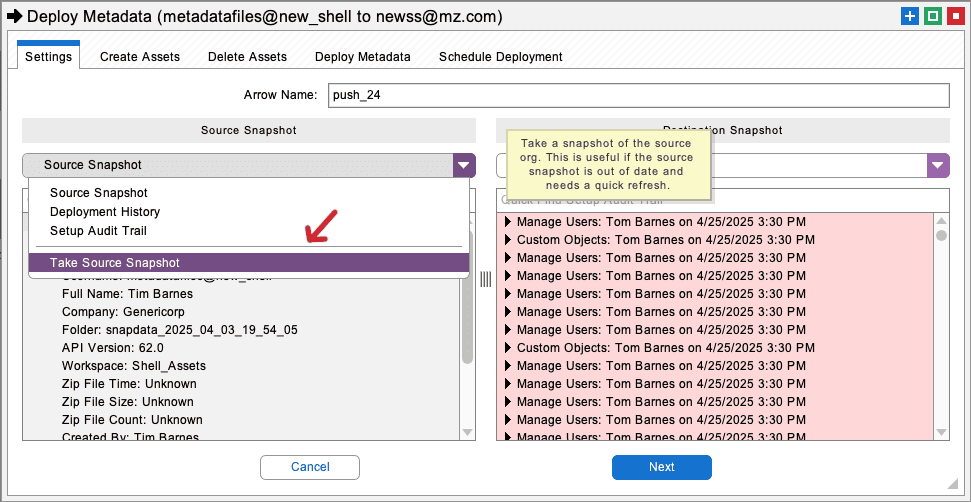
On the first tab, be sure to take a Source Snapshot of the shell assets. You should take a new snapshot any time the files in the developer project are changed. Navigate to the Create Assets tab, right click on the metadata assets list at left, and Select All the shell assets. Move them all into the create job list at right with the Add All button. Proceed to the Deploy Metadata tab and click the Deploy Metadata button to deploy them.
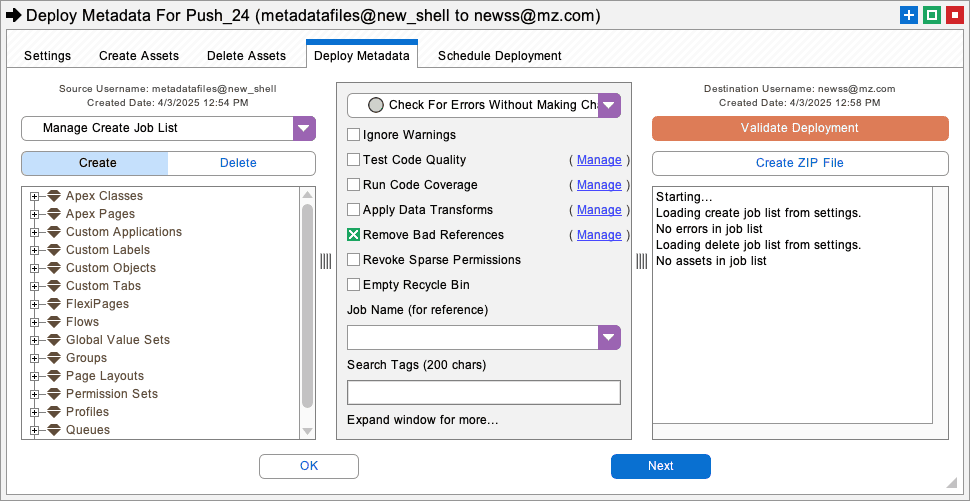
If there are no deployment errors, then you can skip Step 2 below and proceed to Step 3 of this white paper. However, you are likely to receive some deployment errors, not from dependencies, but rather from configuration problems. The next section talks about how to resolve configuration errors.
There are three main types of metadata deployment errors:
Dependency Errors happen when an asset A is being deployed, but asset A references asset B, and asset B is not in the current deployment nor on the destination org. You can include asset B in the deployment, but asset B might reference asset C, and so on. This problem can be avoided by moving lots of assets at the same time, but as more and more assets are deployed together this increases the chance that some other error will stop the deployment. In a complex org, this dependency log jam can prevent all deployment progress. The shell assets are specially designed to avoid triggering these critical dependency errors.
File Format Errors occur when the source metadata cannot be deployed or cannot be validated. You won’t encounter file format errors when you deploy the shell assets. These errors are possible later, and they are discussed in the last section of this white paper.
Configuration Errors, however, cannot be easily avoided. These errors stem from fundamentally different settings in the source and destination org. For example, if one org supports multiple currencies and the other org does not, then you will not be able to deploy a currency field into the destination org.
In some cases, you will have to assign a new license or enable a new feature for the administrative user on the destination org. In other cases, you can try deploying the metadata Settings to the destination. That can correct some configuration errors automatically. But some org settings are not supported by the Metadata API. In that case, try opening two browsers, one for the source org and the other for the destination org, and then compare the Setup menus. Modify the destination org to have the same settings as the source.
Lastly, just by attempting to deploy the shell assets, you will work through many configuration errors. There is no need to deploy ALL the shell assets anyway. It’s a numbers game. If you can deploy most of them that will break the dependency log jam. You will however have to address the configuration errors eventually. If there are irreconcilable differences between the source and destination org, this can be addressed with the dummy assets discussed in the last section, there is more information in the deployment white paper:
https://www.metazoa.com/best-practices-salesforce-change-release-management/
When the configuration errors have been resolved, you should migrate data from the source to the destination org. At this point, the destination org will be ready for data migration, because:
As a first step, we recommend identifying the objects that need to be moved. This is usually all the custom objects and some special group of the standard objects. You should consult with an Administrator who is knowledgeable about the structure and business use cases that are important. Try to organize the objects into related groups that make sense and can be migrated together. Be sure to pay attention to master-detail relationships and move parent and child objects together. Here is a standard object hierarchy that might work as a starting point:
Product2
Pricebook2
PricebookEntry
Account
Attachment
ContentDocumentLink
Contact
Opportunity
OpportunityLineItems
Lead
Task
Event
After the shell assets have been moved to the destination org, you should be sure that you have all the necessary permissions to work with them. Use the Editing Palette in the View Profiles interface to deploy any missing permissions to your destination profile.
You might want to install Managed Packages at this time. Various data records often reference managed objects. Use the Installed Packages metadata type to move packages with the correct version to the destination org.
User data should probably be moved next. You will need a plan to match corresponding users on the source and destination orgs. Be sure you have the Create Audit Fields permission. This will allow you to migrate Created By and Last Modified fields. This permission also lets you migrate records with inactive users.
Begin migrating your data in the desired groups to the destination org. You will want to use External IDs for an org clone project. This guarantees that the record matching is always perfect. Avoid moving more than a few million records at one time. Keep the migrations to a manageable size by splitting up the datasets when needed. There is much more information about moving data in the data migration white paper:
https://www.metazoa.com/snapshot-best-practices-dataset-migration/
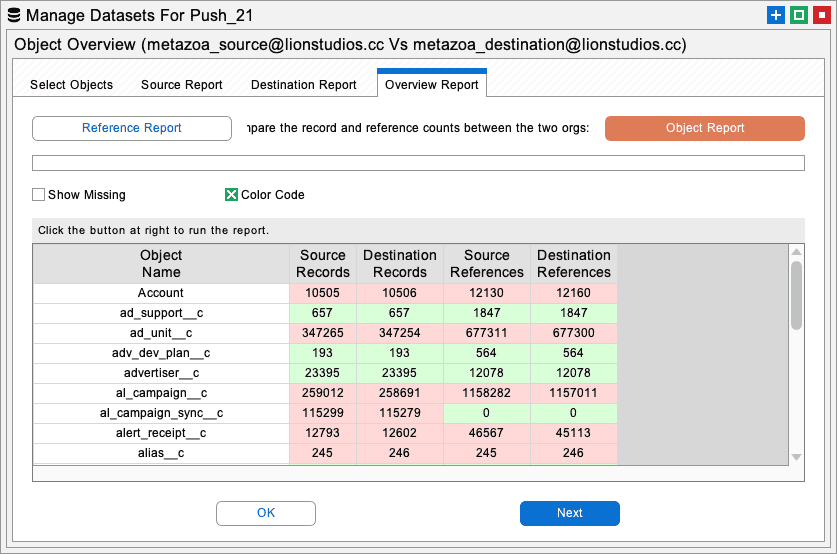
There is one report that is especially useful for moving data during an org clone project. In the Manage Datasets interface, the Object Overview report is a high-level way to compare the records in two orgs. On the first tab, select all the objects you identified in the previous section that need to be moved. On the Overview Report tab, click the Reference Report button. This will generate a report on the selected objects by comparing the number of records and the number of field references. When all the fields have the same number of references (or close) you can be sure that the data records have been migrated successfully.
From a practical standpoint, you must migrate your objects in groups, but this can cause some problems. If object A has a field that references object B, and you migrate object A before you migrate object B, then object A will not have any references to object B after migration. You could migrate object B first, but sometimes there are hundreds of entangled and recursive fields referencing various other objects. Because of this, we recommend moving all the data twice. After the first migration, use the Object Overview report to be sure that the raw number of records is the same on the source and destination orgs and then migrate everything all over again. Use the Reference Report described in the previous section to make sure that all the references have been populated. The combination of using External IDs and checking field reference counts works like a charm.
Once the data has been migrated, you’re ready to deploy the real metadata assets. There are no dependency errors in phase one, because there are no dependencies in Shell Assets, but there are no dependency errors in phase two either, because everything has already been deployed. It’s like a magic trick.
You can move the real metadata types in any order, but we recommend deploying Apex Classes and Triggers last. This avoids long code coverage calculations. Move the regular Classes, then the Triggers, then the Test Classes. Shell Assets include some fake Apex Classes to generate extra code coverage. These should be deleted after the project.
You can encounter file format errors can occur in phase two. This is because many of the real metadata assets in the source org are probably not deployable. Here are some examples:
The list goes on and on. When you encounter assets that cannot be deployed because of file format errors, the easiest thing to do is set up a developer project with Dummy Assets. In the picture of the desktop workspace at the beginning of this white paper, you can see where we create the dummy project.
Download the relevant assets from the source org to this project, and the XML files can be edited by hand. The project folder will store the deployable metadata. Remember to take a snapshot of the developer project before deployment. In this manner, all the file format errors can be delt with and the original metadata deployed correctly. There is more information about developer projects in the white paper:
https://www.metazoa.com/best-practices-salesforce-developer-projects/This whitepaper has discussed the best practices for using shell assets for org split, clones, and merges. The Snapshot product from Metazoa provides a best-of-breed solution for mission critical transitions that require org transformation.
 Congratulations!